基于 Spring Boot 博客系统开发(五)
本系统是简易的个人博客系统开发,为了更加熟练地掌握 SprIng Boot 框架及相关技术的使用。🌿🌿🌿
基于 Spring Boot 博客系统开发(四)👈👈
登录实现
本文使用拦截器(Interceptor)来实现登录功能。拦截器是Spring MVC提供的一种机制,它允许你在请求处理之前或之后执行一些逻辑,比如检查用户是否已登录。
1、创建拦截器类
首先,创建一个实现了HandlerInterceptor接口的类。在这个类中,你可以重写preHandle方法来执行登录检查。LoginInterceptor.java
import org.springframework.stereotype.Component;
import org.springframework.web.servlet.HandlerInterceptor;
import org.springframework.web.servlet.ModelAndView;
import javax.servlet.http.HttpServletRequest;
import javax.servlet.http.HttpServletResponse;
import javax.servlet.http.HttpSession;
@Component
public class LoginInterceptor implements HandlerInterceptor {
    @Override
    public boolean preHandle(HttpServletRequest request, HttpServletResponse response, Object handler) throws Exception {
        HttpSession session = request.getSession();
        Object loginUser = session.getAttribute("loginUser");
        if(loginUser == null){
            response.sendRedirect("https://blog.csdn.net/login");
            return false;
        }
        return true;
    }
    @Override
    public void postHandle(HttpServletRequest request, HttpServletResponse response, Object handler, ModelAndView modelAndView) throws Exception {
    }
    @Override
    public void afterCompletion(HttpServletRequest request, HttpServletResponse response, Object handler, Exception ex) throws Exception {
    }
}
2、注册拦截器
接下来,你需要在Spring MVC的配置中注册这个拦截器。如果你使用的是Java配置,可以通过实现WebMvcConfigurer接口来完成。LoginInterceptor.java
import cn.qvtu.web.interceptor.LoginInterceptor;
import org.springframework.beans.factory.annotation.Autowired;
import org.springframework.context.annotation.Configuration;
import org.springframework.web.servlet.config.annotation.InterceptorRegistration;
import org.springframework.web.servlet.config.annotation.InterceptorRegistry;
import org.springframework.web.servlet.config.annotation.WebMvcConfigurer;
@Configuration
public class LoginConfig implements WebMvcConfigurer {
    @Autowired
    private LoginInterceptor loginInterceptor;
    @Override
    public void addInterceptors(InterceptorRegistry registry) {
        InterceptorRegistration registration = registry.addInterceptor(loginInterceptor);
        registration.addPathPatterns("https://blog.csdn.net/admin/**"); // 拦截/admin下的所有路径
        registration.excludePathPatterns(// 排除特定路径
                "https://blog.csdn.net/login"
        );
    }
}
3、创建登录控制器
这里需要一个密码加密的依赖 Spring Security Core
            org.springframework.security
            spring-security-core
            5.7.6
登录控制器代码:LoginController.java
import cn.qvtu.web.domain.User;
import cn.qvtu.web.service.IUserService;
import com.baomidou.mybatisplus.core.conditions.query.QueryWrapper;
import lombok.extern.slf4j.Slf4j;
import org.apache.commons.lang3.StringUtils;
import org.springframework.beans.factory.annotation.Autowired;
import org.springframework.security.crypto.bcrypt.BCryptPasswordEncoder;
import org.springframework.stereotype.Controller;
import org.springframework.web.bind.annotation.GetMapping;
import org.springframework.web.bind.annotation.PostMapping;
import org.springframework.web.bind.annotation.RequestMapping;
import javax.servlet.http.HttpServletRequest;
import javax.servlet.http.HttpSession;
@Controller
@Slf4j
public class LoginController {
    @Autowired
    private IUserService userService;
    @GetMapping("https://blog.csdn.net/login")
    public String login(){
        return "clienthttps://blog.csdn.net/login";
    }
    @PostMapping("https://blog.csdn.net/login")
    public String formLogin(String username, String password, HttpServletRequest request) {
        if(StringUtils.isBlank(username) || StringUtils.isBlank(password)){
            return "redirect:https://blog.csdn.net/login?error";
        }
        QueryWrapper query = new QueryWrapper<>();
        query.eq("username",username);
        User user = userService.getOne(query);
        BCryptPasswordEncoder encoder = new BCryptPasswordEncoder();
        String encode = encoder.encode(password);
        if(!encoder.matches(password,user.getPassword())){
            return "redirect:https://blog.csdn.net/login?error";
        }
        request.getSession().setAttribute("loginUser",user);
        log.info("登录成功:"+username);
        return "redirect:/";
    }
    @RequestMapping ("https://blog.csdn.net/logout")
    public String logout(HttpServletRequest request) {
        HttpSession session = request.getSession();
        session.invalidate();
        log.info("注销成功:");
        return "redirect:/";
    }

}
登录前端代码: login.html
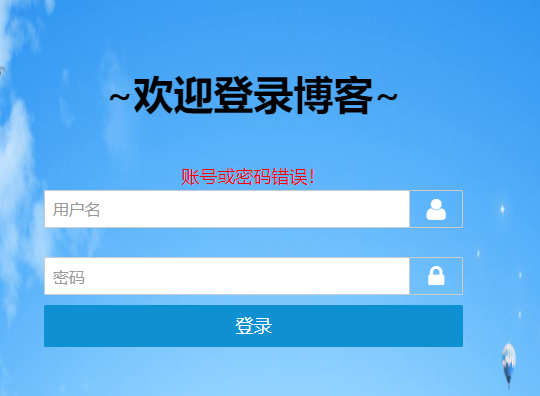
当账号或密码错误提示,${param.error} 从URL中获取参数。
            ~欢迎登录博客~


            账号或密码错误!
账号或密码错误提示效果:
测试登录账号:admin
测试登录密码:123456
4、后台首页控制器
登录成功可以访问后台首页,控制器AdminController.java。
import org.springframework.stereotype.Controller;
import org.springframework.web.bind.annotation.RequestMapping;
@Controller
@RequestMapping("/admin")
public class AdminController {
    @RequestMapping("/")
    public String home(){
        return "admin/index";
    }
}
5、前台首页 header
修改 header 登录、退出、后台管理的访问 URL,这里需要工具类 LoginUtils 处理登录和退出是否显示。
LoginUtils.java
import org.springframework.beans.factory.annotation.Autowired;
import org.springframework.stereotype.Component;
import javax.servlet.http.HttpServletRequest;
@Component
public class LoginUtils {
    @Autowired
    public HttpServletRequest request;
    public boolean isLogin(){
        Object loginUser = request.getSession().getAttribute("loginUser");
        System.out.println(loginUser);
        return loginUser!=null;
    }

}
include.html
6、实现效果:
登录成功显示:
没有登录显示:


![[工业自动化-1]:PLC架构与工作原理](https://img-blog.csdnimg.cn/ce10a1471ed14382bc58364cf8bd5209.png)


还没有评论,来说两句吧...