目录
一、环境搭建
(一)创建数据库表
(二)创建Spring Boot项目
(三)引入依赖
(四)配置MyBatis
(五)导入包结构
二、注册接口
(一)使用Lombok的@DATE注解为实体类提供getter、setter、toString方法
(二)在pojo包中创建一个实体类(Result)
(三)编写实际代码
(四)进行数据校验
(五)异常处理
三、登录接口
(一)在UserController类中加入登录逻辑并添加JWT令牌
四、测试
(一)注册测试
(二)登录测试
一、环境搭建
(一)创建数据库表
我们需要用到的SQL语句(可复制备用)。
-- 创建数据库
create database big_event;
-- 使用数据库
use big_event;
-- 用户表
create table user (
                      id int unsigned primary key auto_increment comment 'ID',
                      username varchar(20) not null unique comment '用户名',
                      password varchar(32)  comment '密码',
                      nickname varchar(10)  default '' comment '昵称',
                      email varchar(128) default '' comment '邮箱',
                      user_pic varchar(128) default '' comment '头像',
                      create_time datetime not null comment '创建时间',
                      update_time datetime not null comment '修改时间'
) comment '用户表';
-- 分类表
create table category(
                         id int unsigned primary key auto_increment comment 'ID',
                         category_name varchar(32) not null comment '分类名称',
                         category_alias varchar(32) not null comment '分类别名',
                         create_user int unsigned not null comment '创建人ID',
                         create_time datetime not null comment '创建时间',
                         update_time datetime not null comment '修改时间',
                         constraint fk_category_user foreign key (create_user) references user(id) -- 外键约束
);
-- 文章表
create table article(
                        id int unsigned primary key auto_increment comment 'ID',
                        title varchar(30) not null comment '文章标题',
                        content varchar(10000) not null comment '文章内容',
                        cover_img varchar(128) not null  comment '文章封面',
                        state varchar(3) default '草稿' comment '文章状态: 只能是[已发布] 或者 [草稿]',
                        category_id int unsigned comment '文章分类ID',
                        create_user int unsigned not null comment '创建人ID',
                        create_time datetime not null comment '创建时间',
                        update_time datetime not null comment '修改时间',
                        constraint fk_article_category foreign key (category_id) references category(id),-- 外键约束
                        constraint fk_article_user foreign key (create_user) references user(id) -- 外键约束
)
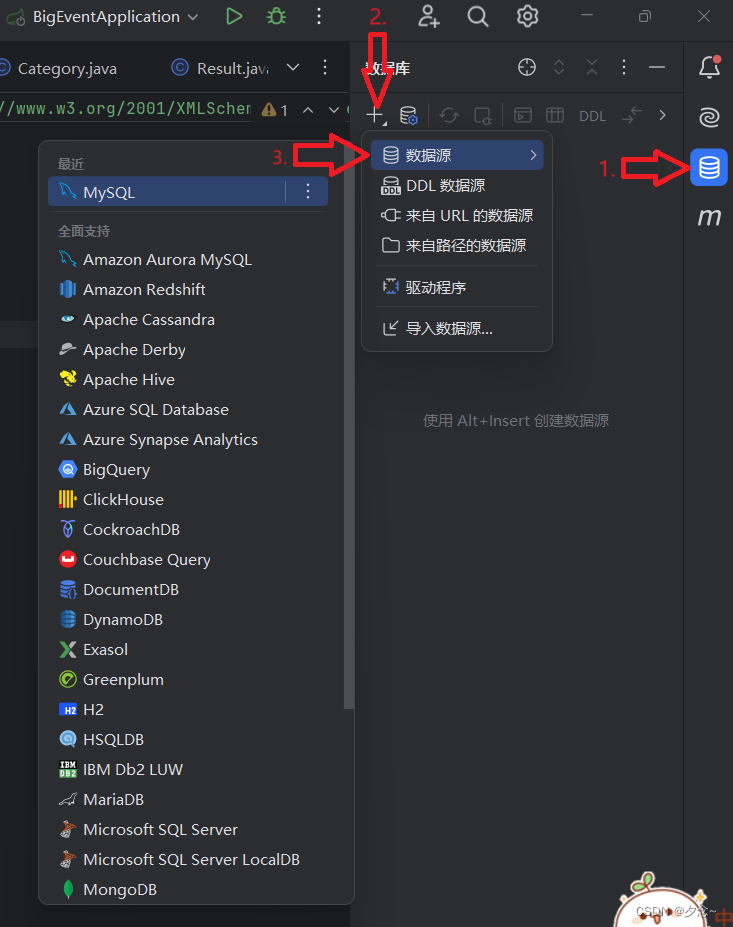
首先打开IDEA配置数据源,选择自己的数据库软件(以MySQL为例)。
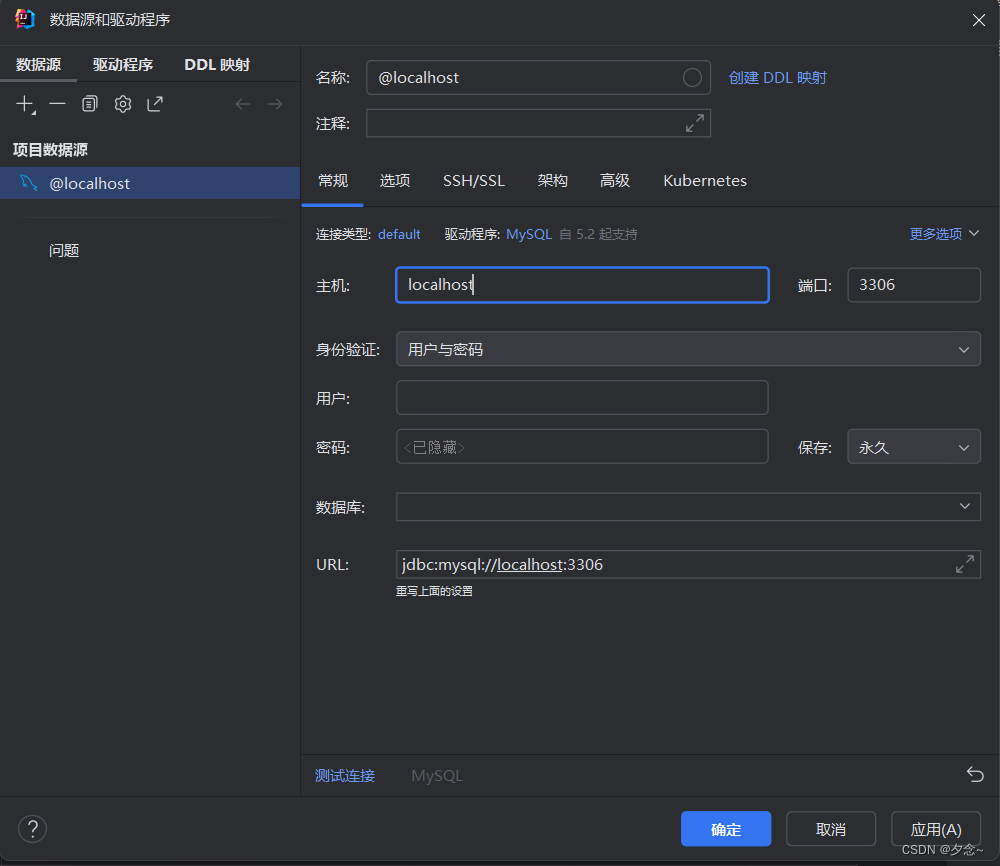
填写用户名和密码,数据库名可不填,在sql语句中会帮我们创建一个名为big_event的数据库,填写完成后可点击测试连接看输入的用户名和密码是否有误。
弹出下图即表示成功,可点击确定。
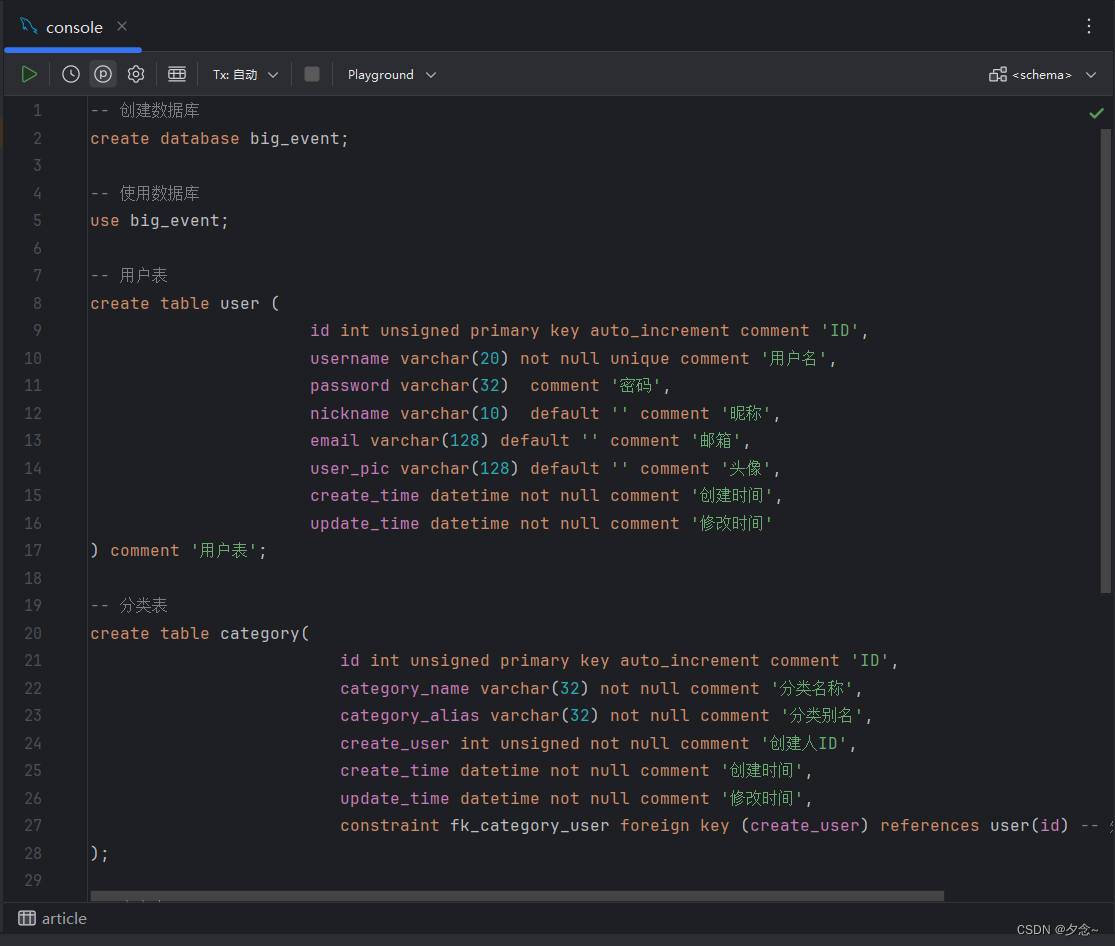
在弹出的console界面将准备好的SQL语句粘贴进去,点击左上角运行,即可成功创建数据库和表。
(二)创建Spring Boot项目
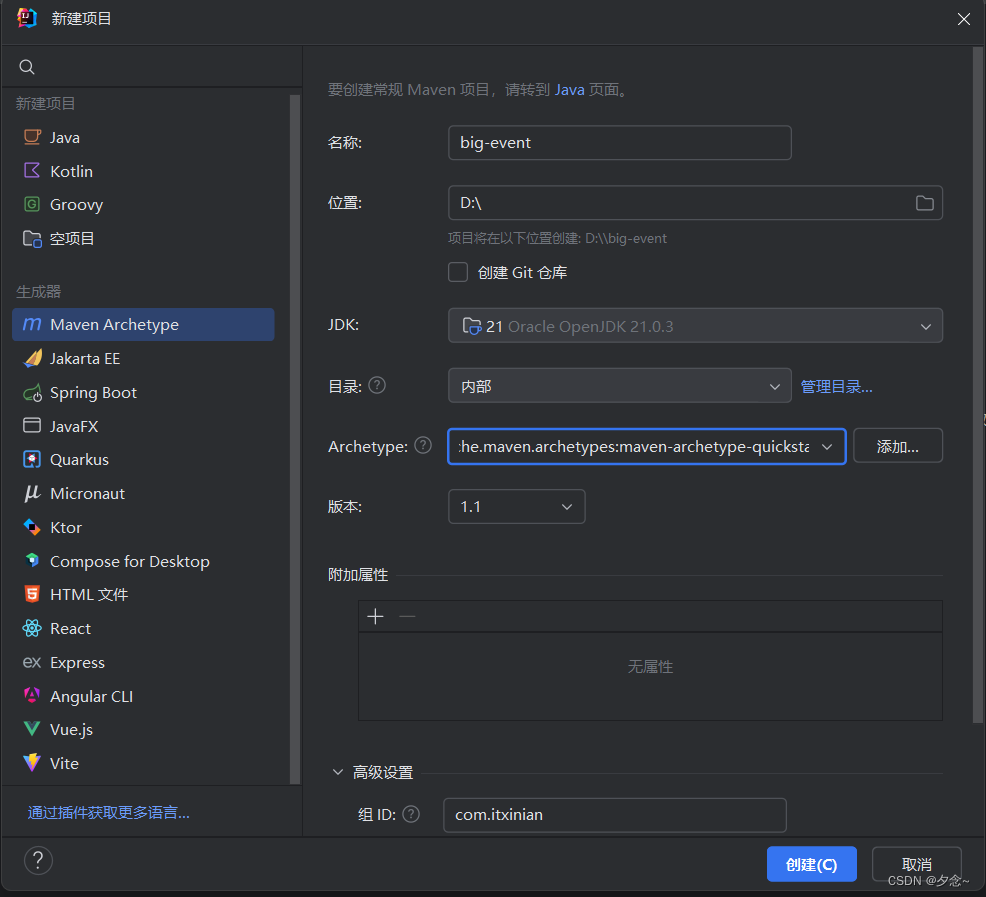
新建一个Maven项目,名称为big-event,选择要存放该项目的位置,选择JDK版本(JDK17+),选择Aychetype为quickstarte结尾的,然后直接创建即可。
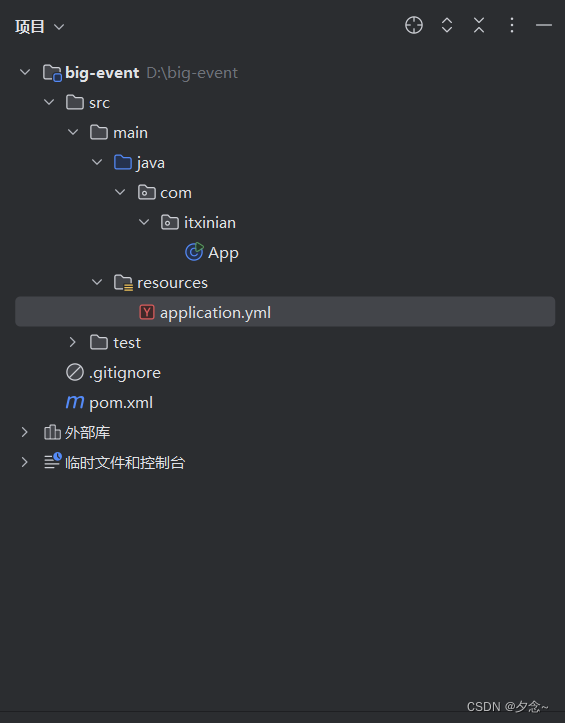
在下图所示目录下创建resources目录和applicatio.yml文件。
(三)引入依赖
打开pom.xml文件,导入所需依赖。
继承父工程。
    spring-boot-starter-parent
    org.springframework.boot
    3.2.5
在
org.springframework.boot spring-boot-starter-weborg.mybatis.spring.boot mybatis-spring-boot-starter3.0.3 com.mysql mysql-connector-j
(四)配置MyBatis
打开application.yml文件,写入MyBatis配置。
spring:
  datasource:
    driver-class-name: com.mysql.cj.jdbc.Driver
    url: jdbc:mysql://localhost:3306/big_event
    username: root
    password: xinian
(五)导入包结构
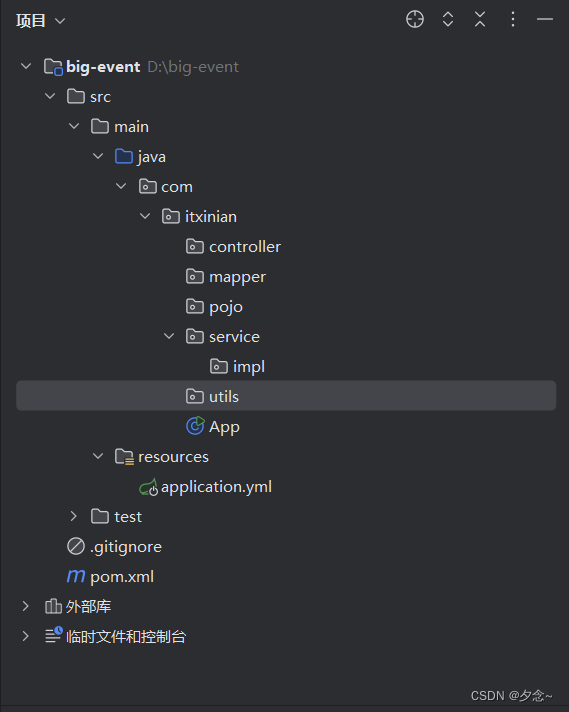
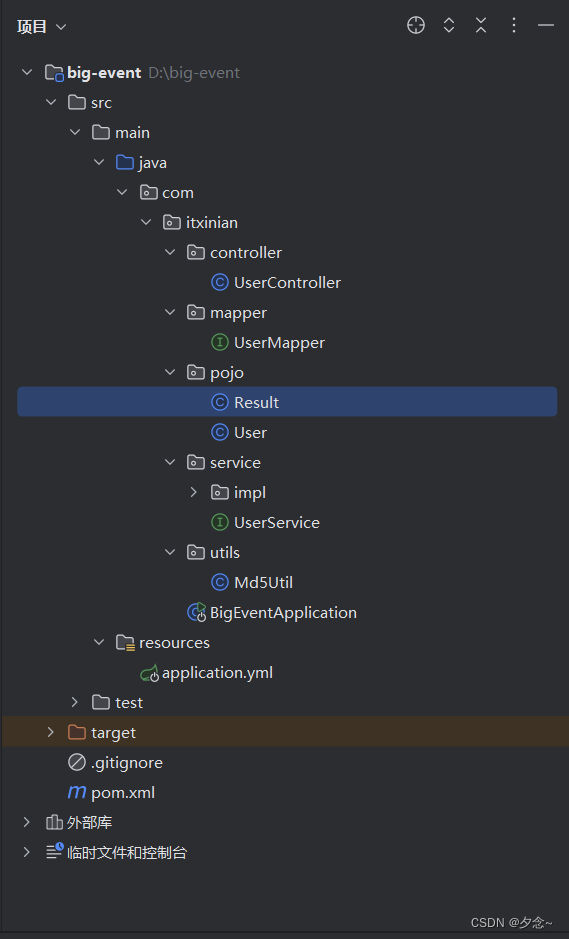
创建下图所示的包结构。
在pojo包中创建一个实体类(User)。
import java.time.LocalDateTime;
public class User {
    private Integer id;//主键ID
    private String username;//用户名
    private String password;//密码
    private String nickname;//昵称
    private String email;//邮箱
    private String userPic;//用户头像地址
    private LocalDateTime createTime;//创建时间
    private LocalDateTime updateTime;//更新时间
}//User类
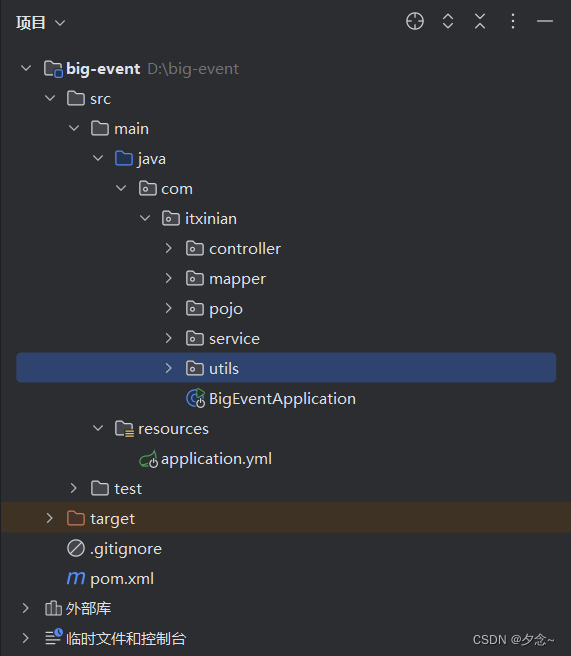
在下图所示位置创建启动类BigEventApplication。
代码如下。
import org.springframework.boot.SpringApplication;
import org.springframework.boot.autoconfigure.SpringBootApplication;
@SpringBootApplication
public class BigEventApplication
{
    public static void main( String[] args ) {
        SpringApplication.run(BigEventApplication.class, args);
    }
}
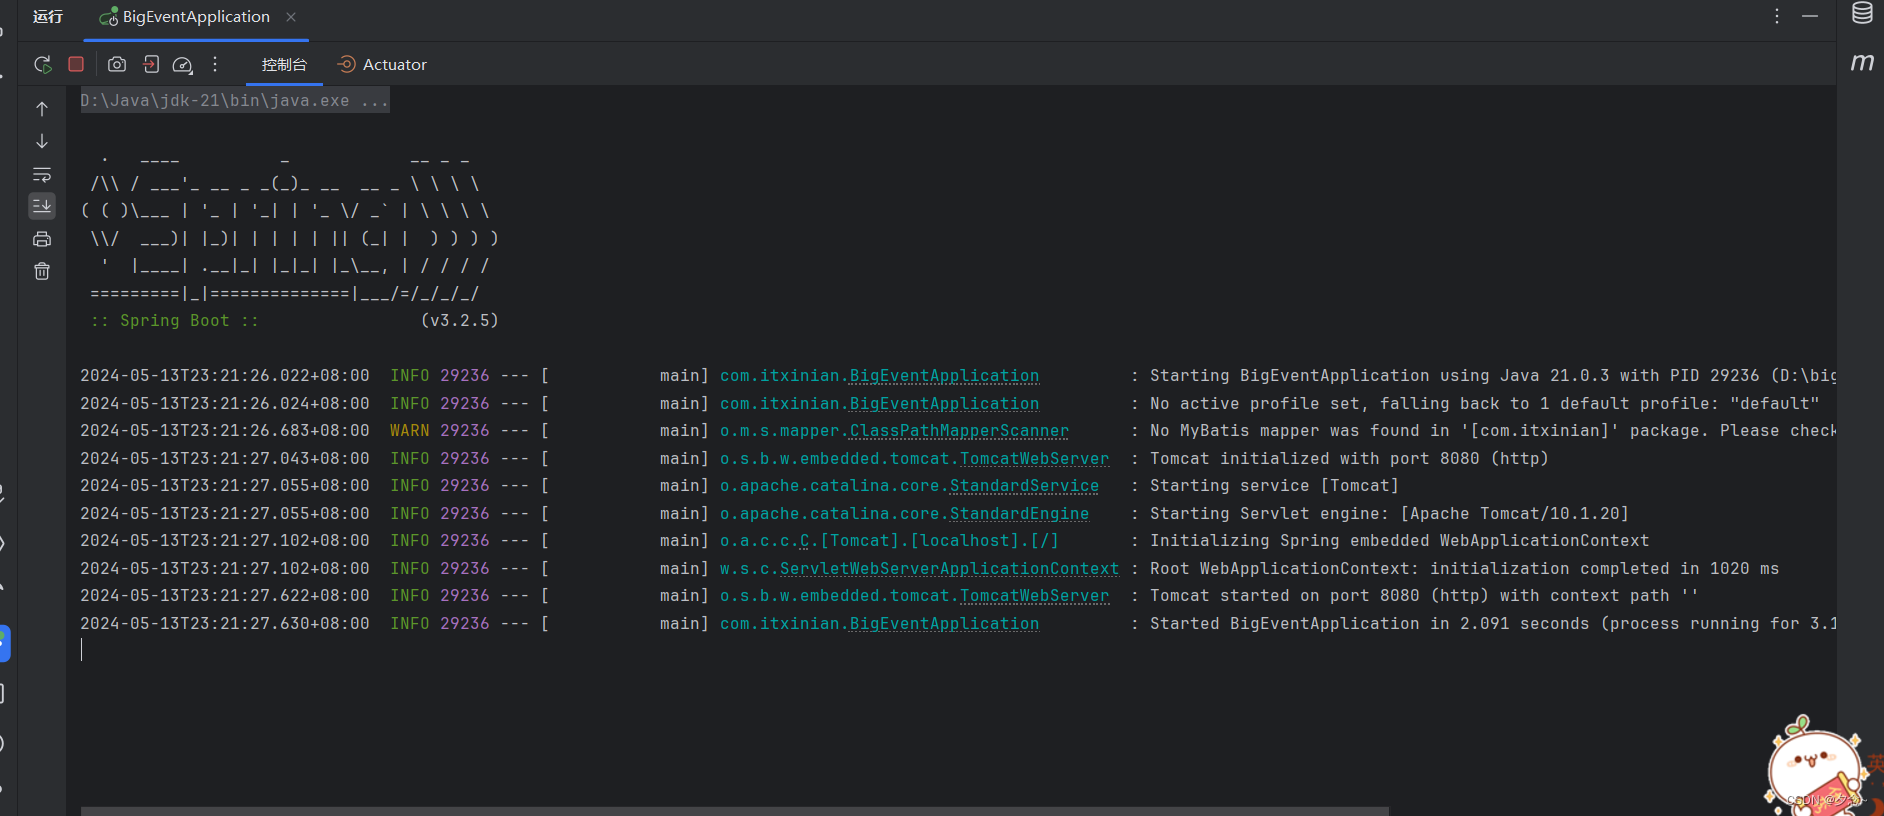
运行启动类,如图即为运行成功。
二、注册接口
(一)使用Lombok的@DATE注解为实体类提供getter、setter、toString方法
在pom.xml文件中引入Lombok依赖。
      org.projectlombok
      lombok
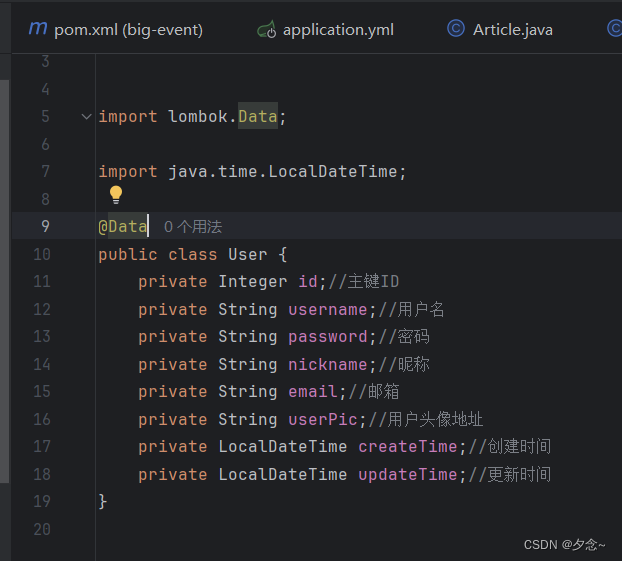
在User类中添加@Data注解。
(二)在pojo包中创建一个实体类(Result)
import lombok.AllArgsConstructor; import lombok.NoArgsConstructor; //统一响应结果 @NoArgsConstructor @AllArgsConstructor public class Result{ private Integer code;//业务状态码 0-成功 1-失败 private String message;//提示信息 private T data;//响应数据 //快速返回操作成功响应结果(带响应数据) public static Result success(E data) { return new Result<>(0, "操作成功", data); } //快速返回操作成功响应结果 public static Result success() { return new Result(0, "操作成功", null); } public static Result error(String message) { return new Result(1, message, null); } }
(三)编写实际代码
按下图创建类和接口
UserController类
import com.itxinian.pojo.Result;
import com.itxinian.pojo.User;
import com.itxinian.service.UserService;
import org.springframework.web.bind.annotation.PostMapping;
import org.springframework.web.bind.annotation.RequestMapping;
import org.springframework.web.bind.annotation.RestController;
@RestController
@RequestMapping("/user")
public class UserController {
    private UserService userService;
    @PostMapping("/register")
    public Result register(String username, String password) {
        User u = userService.findByUserName(username);
        if(u == null){
            userService.register(username,password);
            return Result.success();
        }else{
            return Result.error("用户名已被使用");
        }
    }
}
UserMapper接口
import com.itxinian.pojo.User;
import org.apache.ibatis.annotations.Insert;
import org.apache.ibatis.annotations.Mapper;
import org.apache.ibatis.annotations.Select;
@Mapper
public interface UserMapper {
    @Select("select * from user where username=#{username}")
    User findByUserName(String username);
    @Insert("insert into user(username,password,create_time,update_time)" +
            " values(#{username},#{password},now(),now())")
    void add(String username, String password);
}
UserService接口
import com.itxinian.pojo.User;
public interface UserService {
    User findByUserName(String username);
    void register(String username, String password);
}
Md5Util类
import java.security.MessageDigest;
import java.security.NoSuchAlgorithmException;
public class Md5Util {
    /**
     * 默认的密码字符串组合,用来将字节转换成 16 进制表示的字符,apache校验下载的文件的正确性用的就是默认的这个组合
     */
    protected static char hexDigits[] = {'0', '1', '2', '3', '4', '5', '6', '7', '8', '9', 'a', 'b', 'c', 'd', 'e', 'f'};
    protected static MessageDigest messagedigest = null;
    static {
        try {
            messagedigest = MessageDigest.getInstance("MD5");
        } catch (NoSuchAlgorithmException nsaex) {
            System.err.println(Md5Util.class.getName() + "初始化失败,MessageDigest不支持MD5Util。");
            nsaex.printStackTrace();
        }
    }
    /**
     * 生成字符串的md5校验值
     *
     * @param s
     * @return
     */
    public static String getMD5String(String s) {
        return getMD5String(s.getBytes());
    }
    /**
     * 判断字符串的md5校验码是否与一个已知的md5码相匹配
     *
     * @param password  要校验的字符串
     * @param md5PwdStr 已知的md5校验码
     * @return
     */
    public static boolean checkPassword(String password, String md5PwdStr) {
        String s = getMD5String(password);
        return s.equals(md5PwdStr);
    }
    public static String getMD5String(byte[] bytes) {
        messagedigest.update(bytes);
        return bufferToHex(messagedigest.digest());
    }
    private static String bufferToHex(byte bytes[]) {
        return bufferToHex(bytes, 0, bytes.length);
    }
    private static String bufferToHex(byte bytes[], int m, int n) {
        StringBuffer stringbuffer = new StringBuffer(2 * n);
        int k = m + n;
        for (int l = m; l < k; l++) {
            appendHexPair(bytes[l], stringbuffer);
        }
        return stringbuffer.toString();
    }
    private static void appendHexPair(byte bt, StringBuffer stringbuffer) {
        char c0 = hexDigits[(bt & 0xf0) >> 4];// 取字节中高 4 位的数字转换, >>>
        // 为逻辑右移,将符号位一起右移,此处未发现两种符号有何不同
        char c1 = hexDigits[bt & 0xf];// 取字节中低 4 位的数字转换
        stringbuffer.append(c0);
        stringbuffer.append(c1);
    }
}
(四)进行数据校验
使用Spring Validation,对接口的参数进行合法性校验。
首先需要引入依赖。
      org.springframework.boot
      spring-boot-starter-validation
修改UserController类的代码,编写了一个正则表达式用来判断用户名与密码是否由5到16个非空白字符组成。
import jakarta.validation.constraints.Pattern;
import org.springframework.beans.factory.annotation.Autowired;
import org.springframework.validation.annotation.Validated;
import org.springframework.web.bind.annotation.PostMapping;
import org.springframework.web.bind.annotation.RequestMapping;
import org.springframework.web.bind.annotation.RestController;
@RestController
@RequestMapping("/user")
@Validated
public class UserController {
    @Autowired
    private UserService userService;
    @PostMapping("/register")
    public Result register(@Pattern(regexp = "^\\S{5,16}$") String username,@Pattern(regexp = "^\\S{5,16}$") String password) {
        User u = userService.findByUserName(username);
        if(u == null){
            userService.register(username,password);
            return Result.success();
        }else{
            return Result.error("用户名已被使用");
        }
    }
}
(五)异常处理
参数校验失败异常处理,新建一个包,包名为exception,在它里面新建一个GlobalExceptionHandler类。
import org.springframework.util.StringUtils;
import org.springframework.web.bind.annotation.ExceptionHandler;
import org.springframework.web.bind.annotation.RestController;
import org.springframework.web.bind.annotation.RestControllerAdvice;
@RestControllerAdvice
public class GlobalExceptionHandler {
    @ExceptionHandler(Exception.class)
    public Result handleException(Exception e) {
        e.printStackTrace();
        return Result.error(StringUtils.hasLength(e.getMessage())?e.getMessage() : "操作失败");
    }
}
三、登录接口
(一)在UserController类中加入登录逻辑并添加JWT令牌
导入依赖
com.auth0 java-jwt4.4.0
导入工具类(JwtUtil类)
import com.auth0.jwt.JWT;
import com.auth0.jwt.algorithms.Algorithm;
import java.util.Date;
import java.util.Map;
public class JwtUtil {
    private static final String KEY = "itheima";

	//接收业务数据,生成token并返回
    public static String genToken(Map claims) {
        return JWT.create()
                .withClaim("claims", claims)
                .withExpiresAt(new Date(System.currentTimeMillis() + 1000 * 60 * 60 * 12))
                .sign(Algorithm.HMAC256(KEY));
    }
	//接收token,验证token,并返回业务数据
    public static Map parseToken(String token) {
        return JWT.require(Algorithm.HMAC256(KEY))
                .build()
                .verify(token)
                .getClaim("claims")
                .asMap();
    }
}
编写UserController代码
import com.itxinian.pojo.Result;
import com.itxinian.pojo.User;
import com.itxinian.service.UserService;
import com.itxinian.utils.JwtUtil;
import com.itxinian.utils.Md5Util;
import jakarta.validation.constraints.Pattern;
import org.springframework.beans.factory.annotation.Autowired;
import org.springframework.validation.annotation.Validated;
import org.springframework.web.bind.annotation.PostMapping;
import org.springframework.web.bind.annotation.RequestMapping;
import org.springframework.web.bind.annotation.RestController;
import java.util.HashMap;
import java.util.Map;
@RestController
@RequestMapping("/user")
@Validated
public class UserController {
    @Autowired
    private UserService userService;
    @PostMapping("/register")
    public Result register(@Pattern(regexp = "^\\S{5,16}$") String username,@Pattern(regexp = "^\\S{5,16}$") String password) {
        User u = userService.findByUserName(username);
        if(u == null){
            userService.register(username,password);
            return Result.success();
        }else{
            return Result.error("用户名已被使用");
        }
    }
    @PostMapping("/login")
    public Result login(@Pattern(regexp = "^\\S{5,16}$") String username,@Pattern(regexp = "^\\S{5,16}$")String password){
        User loginUser = userService.findByUserName(username);
        if(loginUser == null){
            return Result.error("用户名错误");
        }
        if(Md5Util.getMD5String(password).equals(loginUser.getPassword())){
            Map claims = new HashMap<>();
            claims.put("id",loginUser.getId());
            claims.put("username",loginUser.getUsername());
            String token = JwtUtil.genToken(claims);
            return Result.success(token);
        }
        return Result.error("密码错误");
    }
}
四、测试
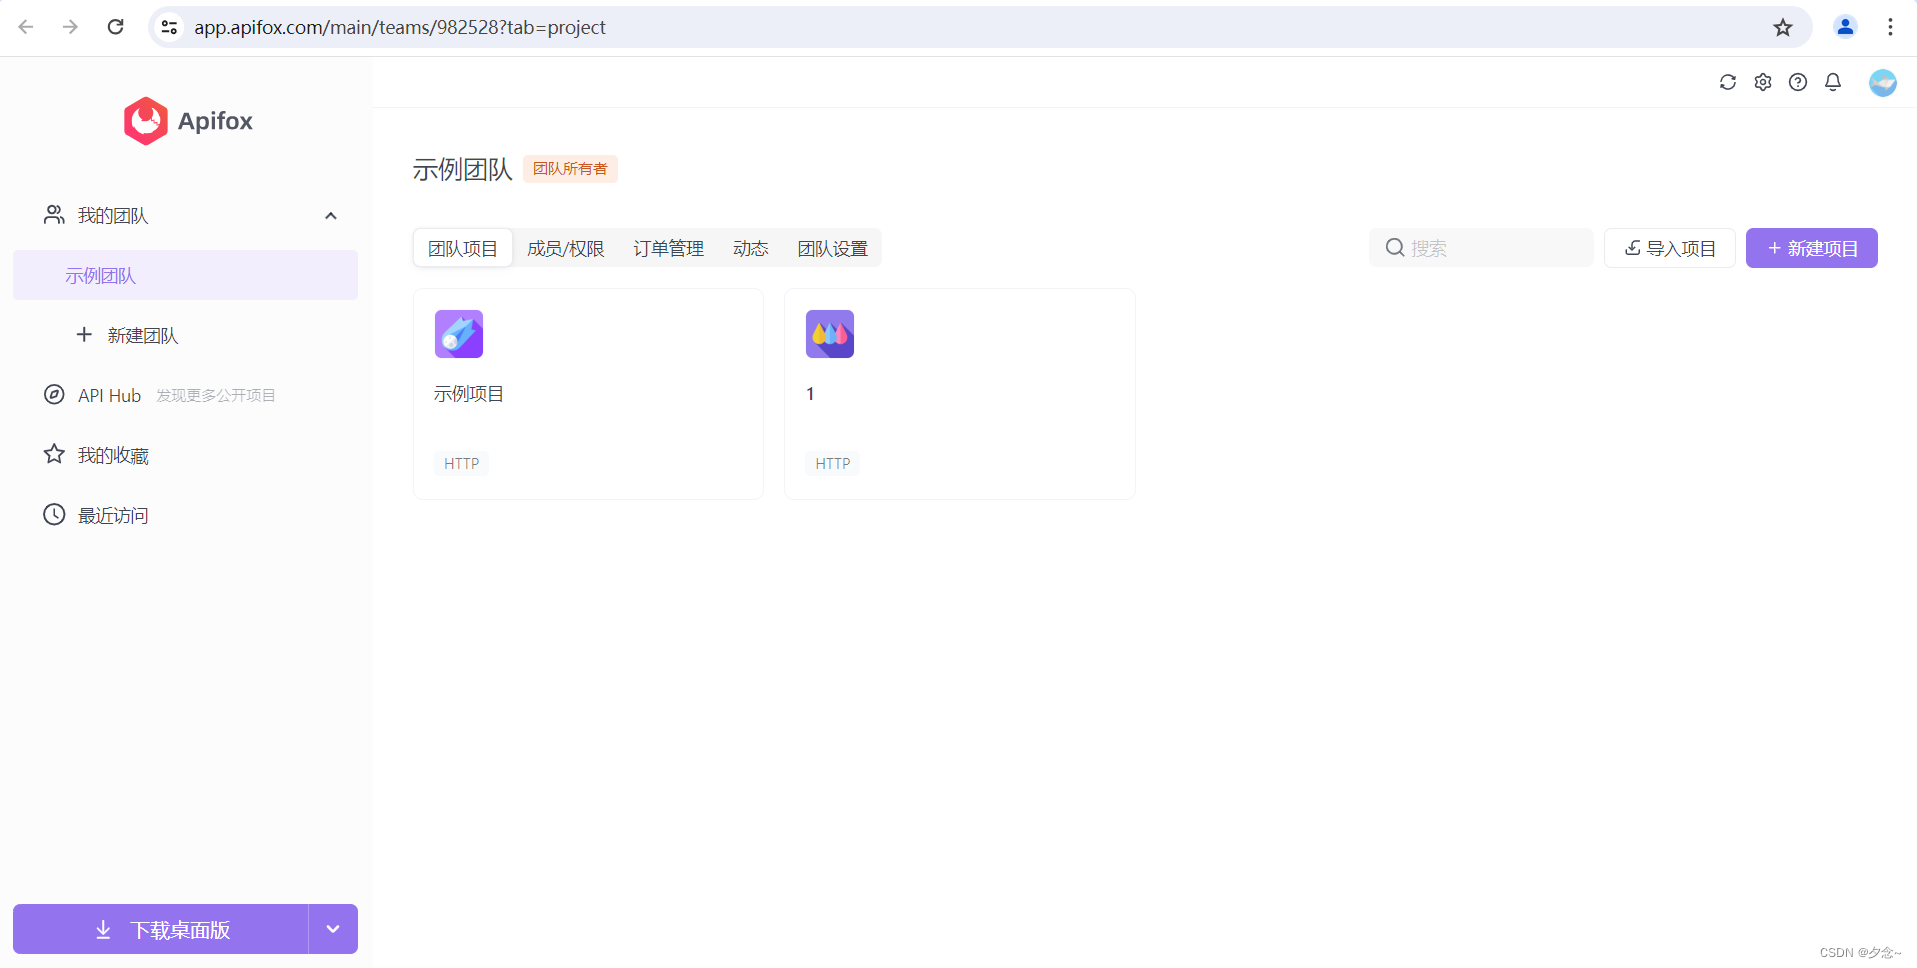
使用Apifox进行接口测试,下载安装后打开Apifox。
Apifox官网:https://apifox.com/
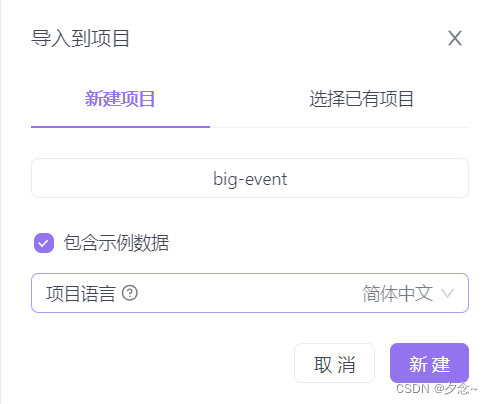
点击导入项目。
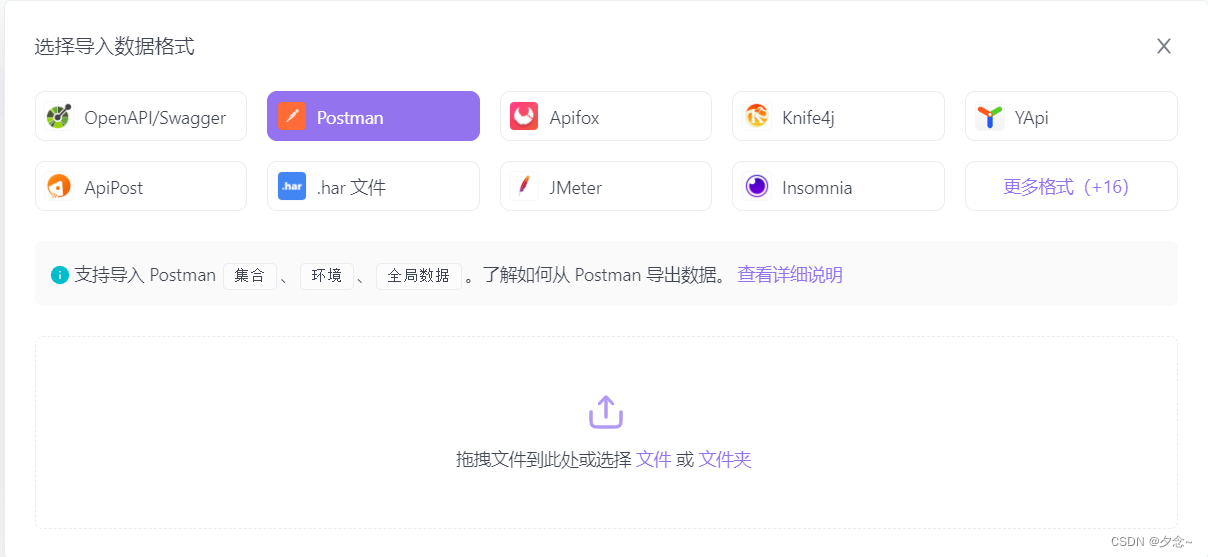
选择Postman,下载文章开头的文件并将其导入。
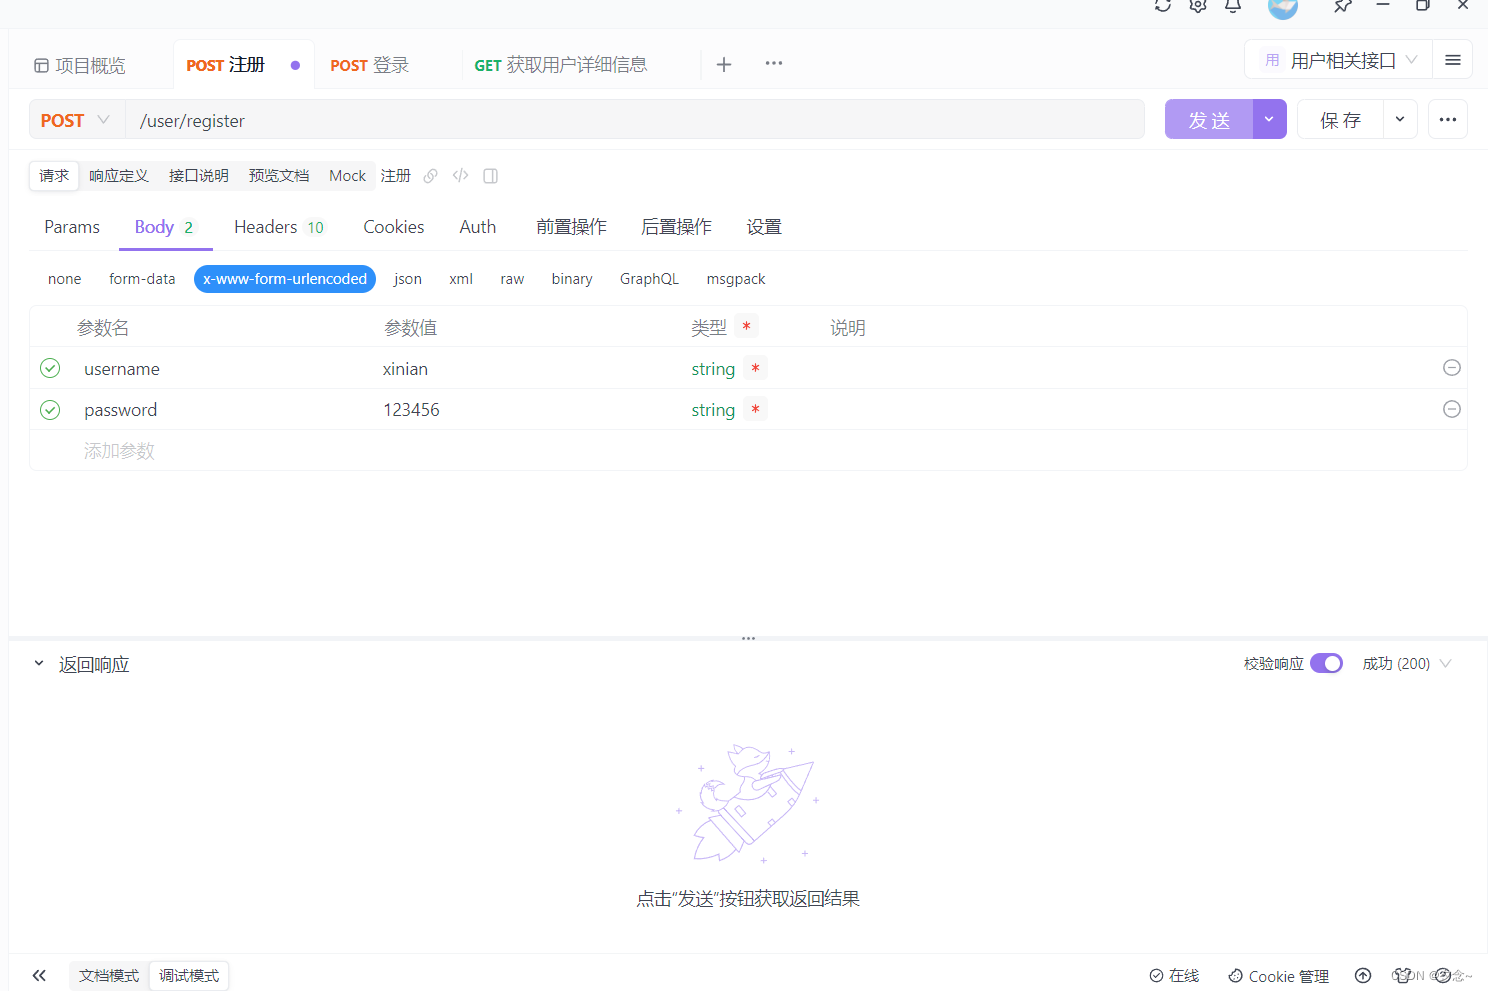
双击注册,点击调试模式,将右上角设置为用户相关接口。
(一)注册测试
改为POST请求,在Body中选择x-www-form-urlencoded,填入测试的username和password,点击发送。
注:可能会出现如下错误, 这时需要在UserController类的private UserService userService上写上@Autowired注解。
重启项目后再次发送请求,这时就会显示操作成功。
(二)登录测试
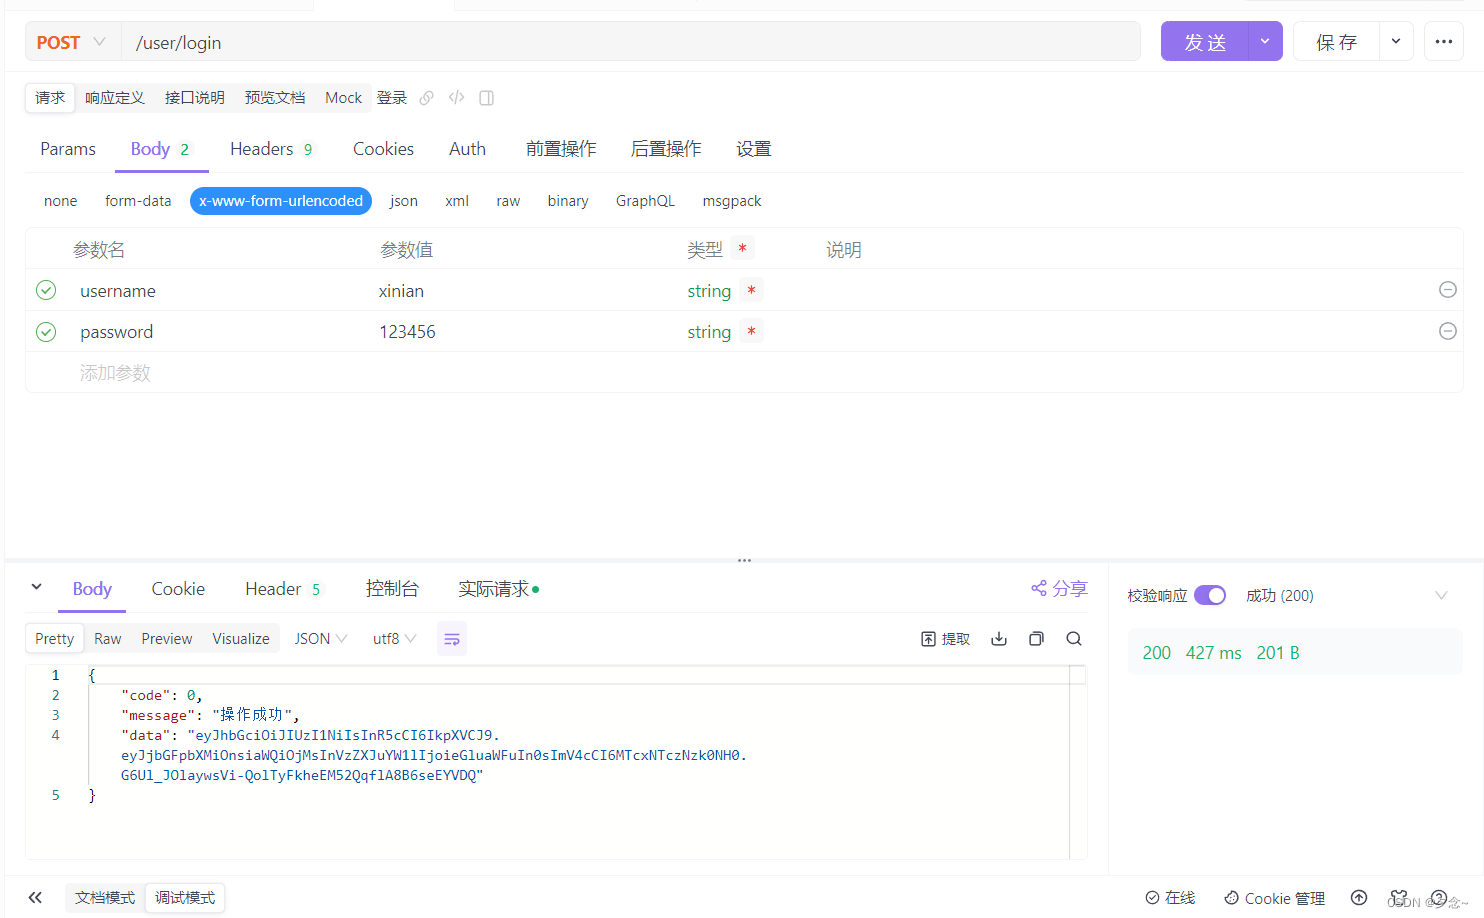
双击登录,填写注册时使用的信息。






![[工业自动化-1]:PLC架构与工作原理](https://img-blog.csdnimg.cn/ce10a1471ed14382bc58364cf8bd5209.png)



还没有评论,来说两句吧...