本文由体验技术团队 TinyEngine 项目成员炽凌创作,欢迎大家实操体验,本体验内容基于 TinyEngine 低代码引擎提供的环境,介绍了如何通过 TinyEngine 低代码引擎实现三方物料集成,帮助开发者快速开发。
知识背景
1.1 TinyEngine 低代码引擎简介
- TinyEngine 是 OpenTiny 团队2023年开源的一个低代码引擎。使能开发者定制低代码平台。它是低代码平台的底座,提供可视化搭建页面等基础能力,既可以通过线上搭配组合,也可以通过下载源码进行二次开发,实时定制出自己的低代码平台。适用于多场景的低代码平台开发,如:资源编排、服务端渲染、模型驱动、移动端、大屏端、页面编排等。
- 代码托管GitHub:https://github.com/opentiny/tiny-engine (欢迎大家 Star 和 提Issue、PR 进行反馈)
- TinyEngine 官网:https://opentiny.design/tiny-engine#/home
- TinyEngine 在线demo:https://opentiny.design/tiny-engine#/tiny-engine-editor
1.2 TinyEngine 第三方物料集成简介
- TinyEngine 默认自带 TinyVue 组件库的物料。同时也支持集成其他第三方组件库比如 Element Plus 、Ant Design Vue 或者是业务方自己的业务组件库。
三方物料集成指导说明
2.1 项目初始化
在进行项目初始化之前,先确保开发环境以及工具齐全:
- Node.js v16+版本、pnpm 包管理工具。
- vscode 代码编辑器、git 代码版本管理工具。
- chrome浏览器 110+ 版本。
- 必要的前端开发环境、工具等。
工具齐全之后,开始克隆项目:
# 从 github 中克隆项目
git clone https://github.com/opentiny/tiny-engine.git
# 从 gitee 中克隆项目
git clone https://gitee.com/opentiny/tiny-engine.git
安装依赖并启动项目:
# 安装依赖,如果没有 pnpm 工具,可以先执行 npm i -g pnpm 安装
pnpm install
# 拆分原有物料
pnpm splitMaterials
# 持续监听构建物料
pnpm buildMaterials
# 另开一个终端,本地启动低代码引擎
pnpm dev
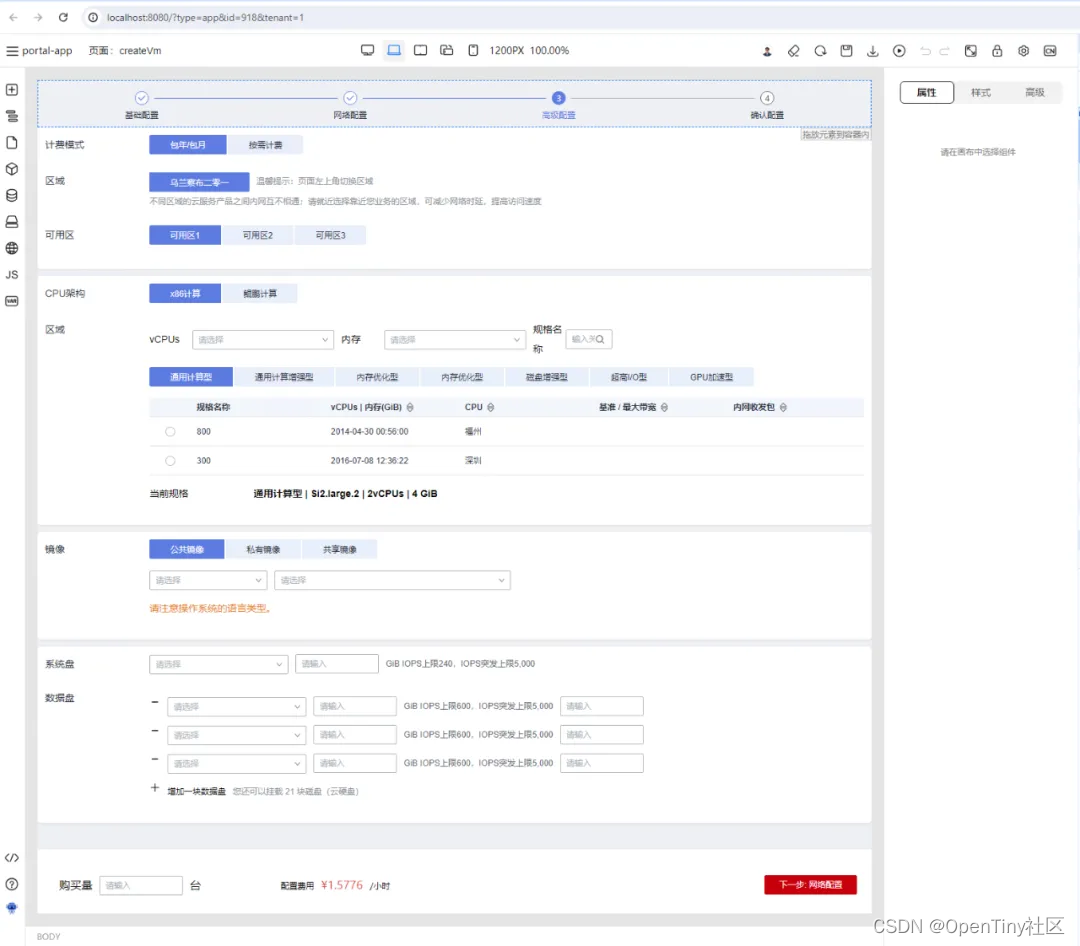
启动完项目之后,可以看到浏览器打开的默认的页面编排设计器:
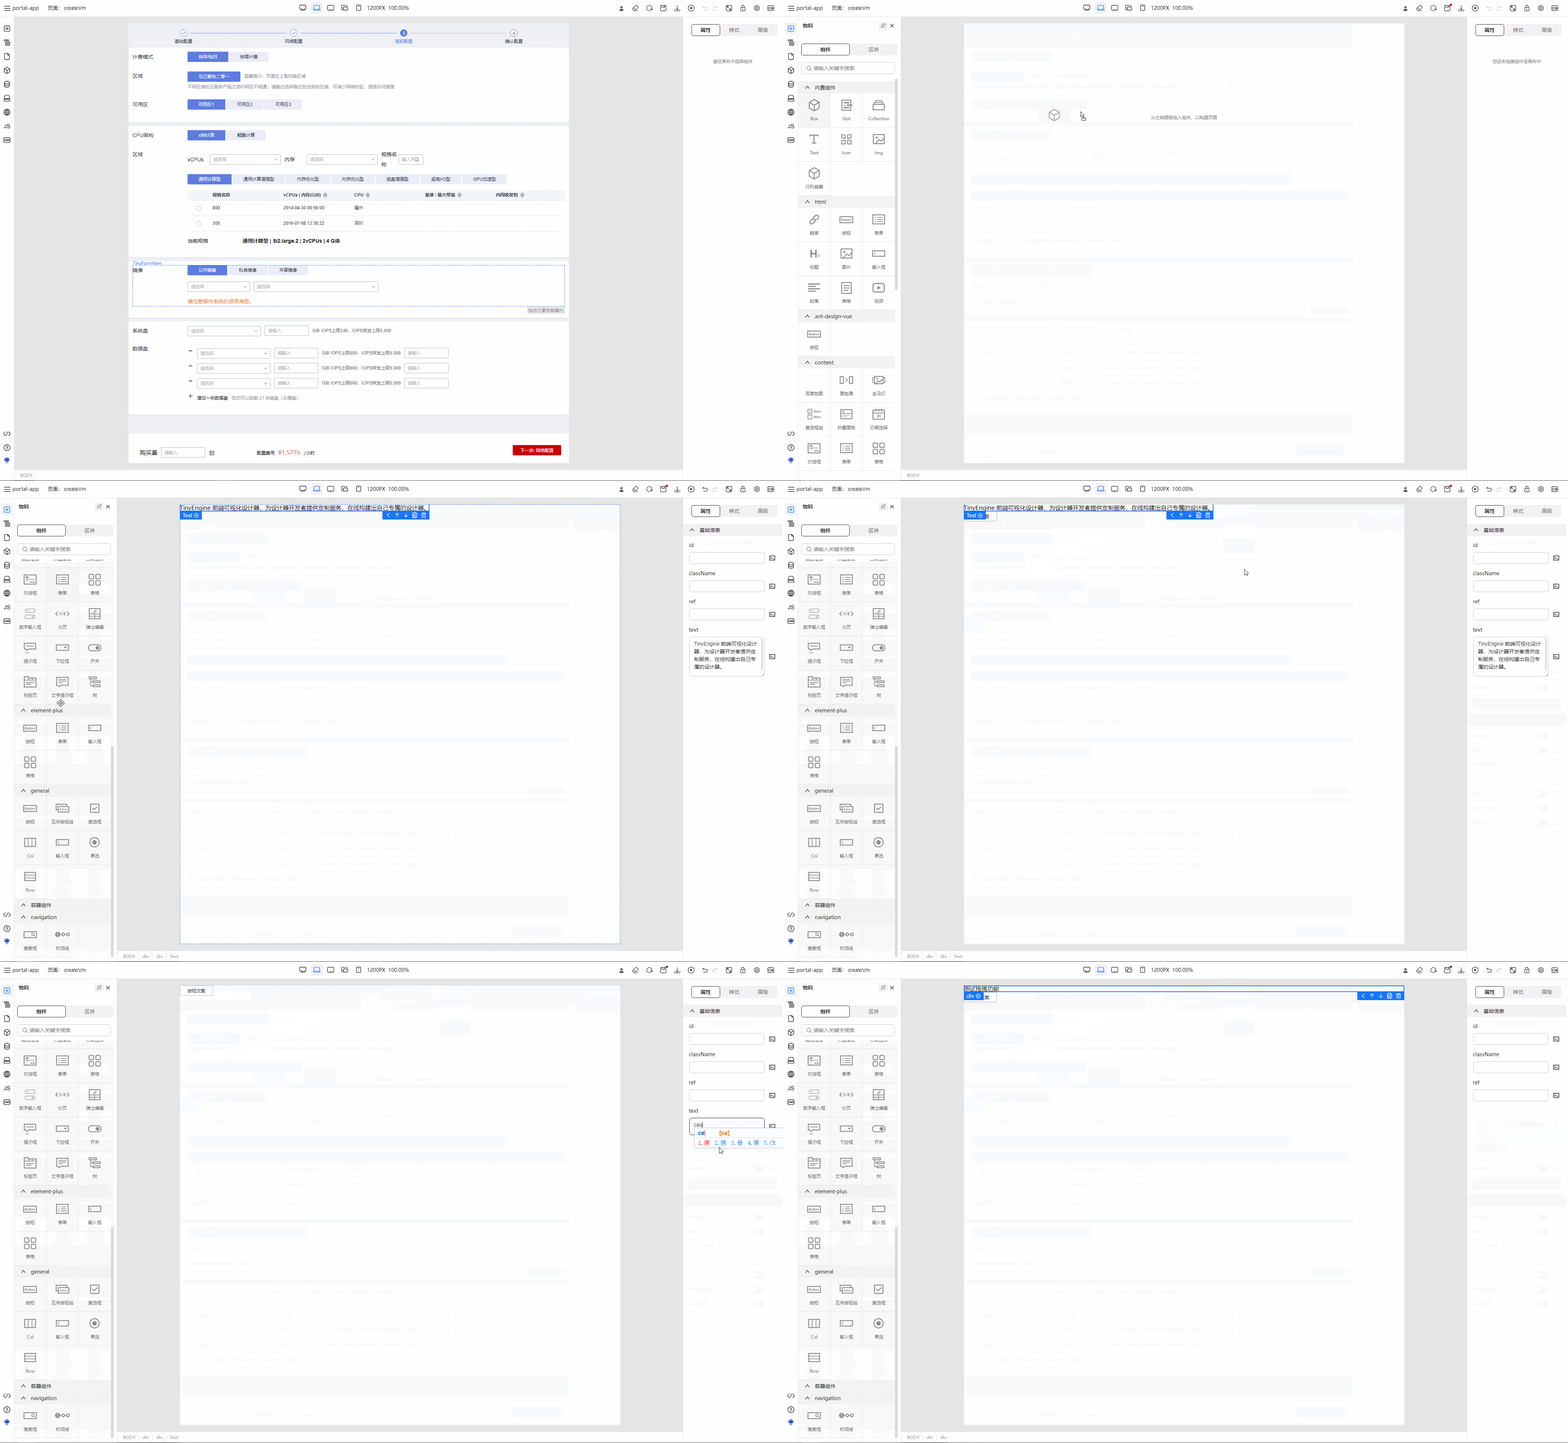
打开清空当前页面,打开物料面板尝试拖拽添加物料。
至此,已经完成了启动 TinyEngine 低代码引擎并使用物料在画布进行编排的功能。
接下来,导入第三方的组件库的组件,这里以 Element Plus 组件库的 Button 组件为例。
导入组件库的组件大致分为两步:
- 获取组件库 esm 的运行时产物地址,根据物料协议添加组件,拖入画布确认能正常渲染显示。
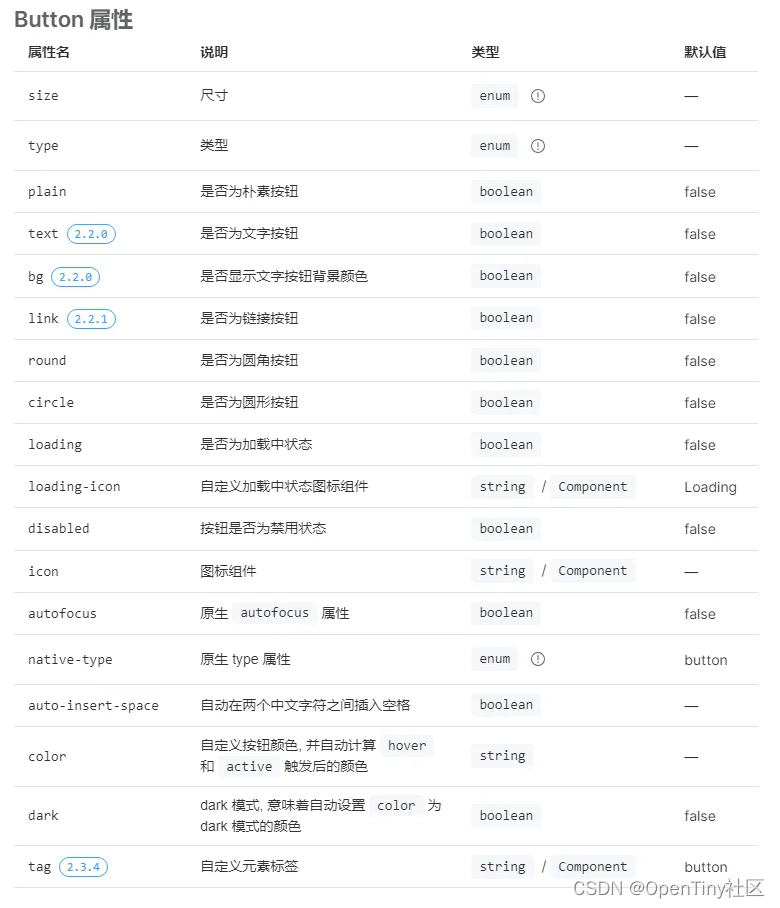
- 根据组件文档添加 schema 配置,方便在画布中进行选中之后能够在属性面板配置组件的属性。
2.2 配置添加基本物料
为了能够添加组件,可以先在项目根目录的 materials/components 路径下添加对应的组件 json 文件,比如,添加 Element Plus 组件库的 Button 组件,那么就在该路径下面添加 ElButton.json 文件。
文件里的内容,大致就是根据物料协议文档进行添加:https://opentiny.design/tiny-engine#/protocol 。
下面添加一个示例,该示例代码添加了 ElementPlus 组件库的 Button 组件,并包含了基本的字段:
- npm:npm 字段描述了该组件所属的 package(组件库),以及版本、esm 画布运行时、导出名称等等信息
- component:component 字段是 esm 画布运行时导出的名称。
- schema:schema 描述了该组件支持的配置属性,在画布选中组件之后,在右侧属性面板会展示 schema 配置的可配置属性。
- snippets:snippets 为一个数组,表示改组件在左侧物料面板中展示的内容。
- snippets.schema :该 schema 为预置的一些 children、属性配置等等。可以让用户拖出即可用,达到零配置的效果。
- 等等…
{
  "id": 1,
  "version": "2.4.2",
  "name": {
    "zh_CN": "按钮"
  },
  "component": "ElButton",
  "icon": "button",
  "description": "常用的操作按钮",
  "doc_url": "",
  "screenshot": "",
  "tags": "",
  "keywords": "",
  "dev_mode": "proCode",
  "npm": {
    // 组件库名称
    "package": "element-plus",
    // 组件库版本
    "version": "2.4.2",
    // 组件库 esm 运行时
    "script": "https://unpkg.com/element-plus@2.4.2/dist/index.full.mjs",
    // 组件库 css 样式表
    "css": "https://unpkg.com/element-plus@2.4.2/dist/index.css",
    "dependencies": null,
    // 组件库导出名
    "exportName": "ElButton"
  },
  "group": "基础组件",
  "category": "element-plus",
  "configure": {
    "loop": true,
    "condition": true,
    "styles": true,
    "isContainer": true,
    "isModal": false,
    "isPopper": false,
    "nestingRule": {
      "childWhitelist": "",
      "parentWhitelist": "",
      "descendantBlacklist": "",
      "ancestorWhitelist": ""
    },
    "isNullNode": false,
    "isLayout": false,
    "rootSelector": "",
    "shortcuts": {
      "properties": [
        "type",
        "size"
      ]
    },
    "contextMenu": {
      "actions": [
        "copy",
        "remove",
        "insert",
        "updateAttr",
        "bindEevent",
        "createBlock"
      ],
      "disable": []
    },
    "invalidity": [
      ""
    ],
    "clickCapture": true,
    "framework": "Vue"
  },
  "schema": {
    "properties": [
      {
        "name": "0",
        "label": {
          "zh_CN": "基础属性"
        },
        // 这里配置组件可配置属性
        "content": [
          {
            "property": "size",
            "label": {
              "text": {
                "zh_CN": "size"
              }
            },
            "description": {
              "zh_CN": "尺寸"
            },
            "required": true,
            "readOnly": false,
            "disabled": false,
            "cols": 12,
            "labelPosition": "top",
            "type": "string",
            "defaultValue": "default",
            "widget": {
              "component": "MetaSelect",
              "props": {
                "options": [
                  {
                    "label": "large",
                    "value": "large"
                  },
                  {
                    "label": "default",
                    "value": "default"
                  },
                  {
                    "label": "small",
                    "value": "small"
                  }
                ]
              }
            }
          }
        ],
        "description": {
          "zh_CN": ""
        }
      }
    ],
    "events": {},
    // 插槽声明定义
    "slots": {

    }
  },
  "snippets": [
    // 物料面板的配置
    {
      "name": {
        "zh_CN": "按钮"
      },
      "icon": "button",
      "screenshot": "",
      "snippetName": "ElButton",
      "schema": {
        "children": [
          {
            "componentName": "Text",
            "props": {
              "text": "按钮文本"
            }
          }
        ]
      }
    }
  ]
}
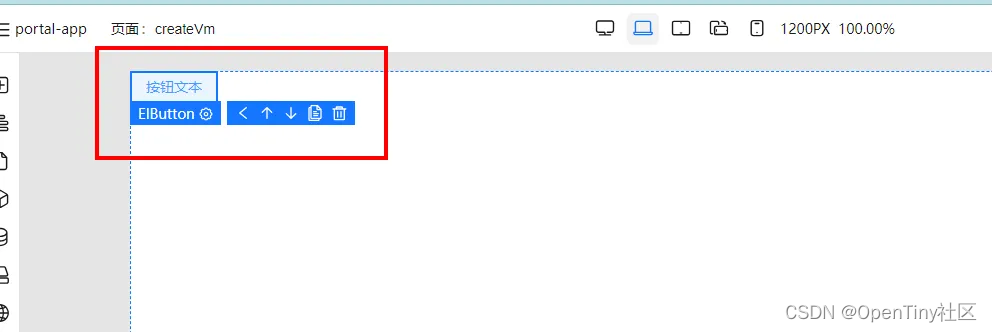
添加保存以上内容,刷新页面,并从物料面板中拖拽出来 ElButton组件,发现可以正常渲染。
至此,已经实现了如何添加一个第三方物料到 TinyEngine 低代码引擎中,接下来,可以进一步完善物料配置,可以直接右侧属性面板进行组件的相关属性配置。
2.3 添加物料配置描述
无论是基础公共组件库还是业务组件库,每个组件都会存在一些配置,方便用户定制化一些组件的表现行为以及样式。同样的,在画布拖拽编排好组件之后,可能需要对组件进行一些配置,这需要根据物料协议以及组件文档添加可配置项。
以 Element Plus 的 Button 组件为例:
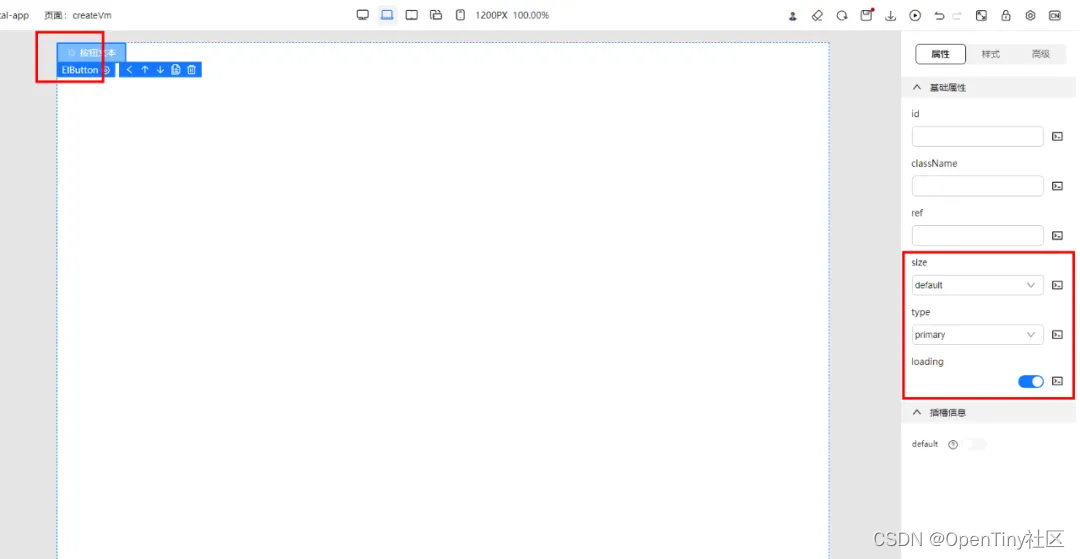
假如需要添加 type、size、loading 等三个可配置属性项,则可以添加如下的属性配置项:
以下代码主要在 schema.properties[0].content 中添加了 type、size、loading 等三个属性。主要有几个关键属性:
- property:property 属性值与组件的可配置属性项一一对应。即 size -> size 、type -> type、loading -> loading
- label:label 对应右侧属性面板显示的可配置项描述。
- description:对 label 的更详细补充描述。
- widget:用于配置该属性的表单配置。如 type 可以用下拉选择框让用户选择对应的 type,loading 则可以用 switch 开关配置。
- widget.component:描述使用什么配置组件
- widget.props:描述改配置组件的 props。
- 等等…
{
    "component": "ElButton",
    // ... 参考上述原有配置
    "schema": {
        // 这里添加可配置属性数组
        "properties": [
            {
                "label": {
                    "zh_CN": "基础属性"
                },
                "content": [
                    {
                        // property 代表可配置属性为 size
                        "property": "size",
                        // label 是展示在属性面板的可配置项名称
                        "label": {
                            "text": {
                                "zh_CN": "size"
                            }
                        },
                        // 对可配置项的描述
                        "description": {
                            "zh_CN": "尺寸"
                        },
                        "required": false,
                        "readOnly": false,
                        "disabled": false,
                        "cols": 12,
                        "labelPosition": "top",
                        "type": "string",
                        "defaultValue": "default",
                        "widget": {
                            // 可配置项是一个下拉框
                            "component": "MetaSelect",
                            // 下拉框的可选值,有 large、default、以及 small
                            "props": {
                                "options": [
                                    {
                                        "label": "large",
                                        "value": "large"
                                    },
                                    {
                                        "label": "default",
                                        "value": "default"
                                    },
                                    {
                                        "label": "small",
                                        "value": "small"
                                    }
                                ]
                            }
                        }
                    },
                    {
                        "property": "type",
                        "label": {
                            "text": {
                                "zh_CN": "type"
                            }
                        },
                        "description": {
                            "zh_CN": "类型"
                        },
                        "required": false,
                        "readOnly": false,
                        "disabled": false,
                        "cols": 12,
                        "labelPosition": "top",
                        "type": "string",
                        "widget": {
                            "component": "MetaSelect",
                            "props": {
                                "options": [
                                    {
                                        "label": "primary",
                                        "value": "primary"
                                    },
                                    {
                                        "label": "success",
                                        "value": "success"
                                    },
                                    {
                                        "label": "warning",
                                        "value": "warning"
                                    },
                                    {
                                        "label": "danger",
                                        "value": "danger"
                                    },
                                    {
                                        "label": "info",
                                        "value": "info"
                                    }
                                ]
                            }
                        }
                    },
                    {
                        "property": "loading",
                        "label": {
                            "text": {
                                "zh_CN": "loading"
                            }
                        },
                        "description": {
                            "zh_CN": "是否为加载中状态"
                        },
                        "required": false,
                        "readOnly": false,
                        "disabled": false,
                        "cols": 12,
                        "labelPosition": "top",
                        "type": "string",
                        "widget": {
                            "component": "MetaSwitch",
                            "props": {}
                        },
                        "device": []
                    }
                ]
            }
        ]
    }
}
添加完之后,保存文件,刷新浏览器,重新拖入 ElButton 组件并选中。会发现右侧属性面板添加上了配置的属性配置项。
经过此步骤,就顺利完成了在物料中添加可配置选项这一环节。这使得用户也可以在画布中方便地配置属性并复用组件。
2.4 配置物料插槽
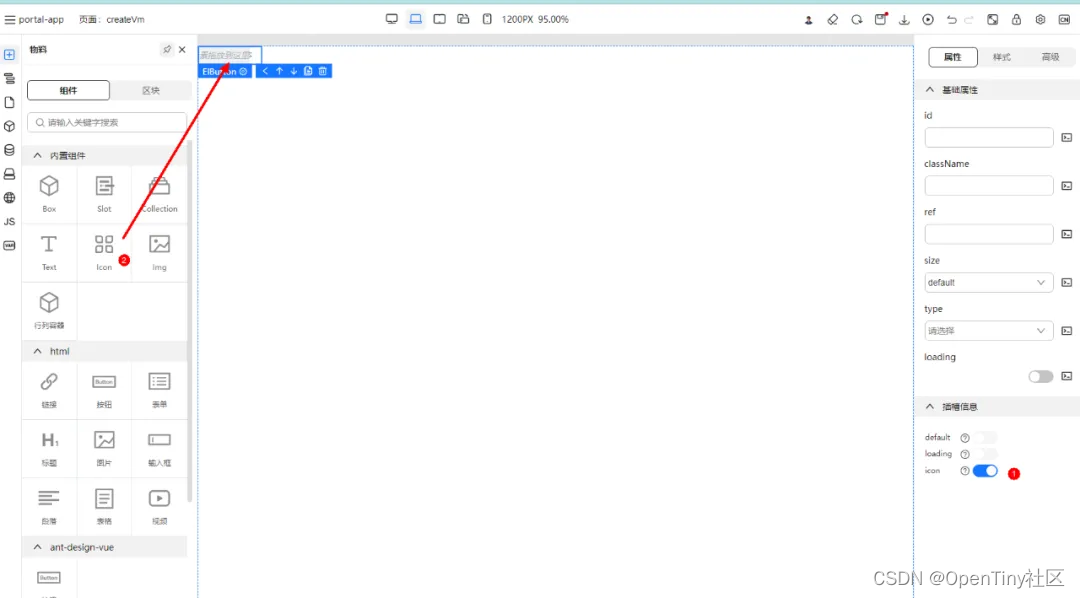
除了属性配置之外,还有一种特殊的配置:插槽配置。某些组件会内置特定的插槽,让用户可以自定义组件中某一部分的UI或者行为。以 Element Plus 中的 Button 组件为例,该组件提供了 default、loading、icon 三个插槽。同样,TinyEngine 的物料协议支持配置插槽的可选项,用户可以在设置面板中启用插槽开关,然后往插槽拖入内容。
以下是配置 Element Plus Button 组件的 icon 插槽的配置示例:
该示例主要在 schema 结构下添加了 slots 配置。
- slots.xxx: xxx 代表插槽名称。
- slots.xxx.label:代表在右侧属性面板显示的名称。
- slots.xxx.description:对 label 的补充描述(默认 hover 之后才会显示)。
{
    "component": "ElButton",
    // ... 参考上述原有配置
    "schema": {
        // 这里添加可配置属性数组
        "properties": [
            {
                "label": {
                    "zh_CN": "基础属性"
                },
                "content": [
                    {
                        // property 代表可配置属性为 size
                        "property": "size",
                        // label 是展示在属性面板的可配置项名称
                        "label": {
                            "text": {
                                "zh_CN": "size"
                            }
                        },
                        // 对可配置项的描述
                        "description": {
                            "zh_CN": "尺寸"
                        },
                        "required": false,
                        "readOnly": false,
                        "disabled": false,
                        "cols": 12,
                        "labelPosition": "top",
                        "type": "string",
                        "defaultValue": "default",
                        "widget": {
                            // 可配置项是一个下拉框
                            "component": "MetaSelect",
                            // 下拉框的可选值,有 large、default、以及 small
                            "props": {
                                "options": [
                                    {
                                        "label": "large",
                                        "value": "large"
                                    },
                                    {
                                        "label": "default",
                                        "value": "default"
                                    },
                                    {
                                        "label": "small",
                                        "value": "small"
                                    }
                                ]
                            }
                        }
                    }
                ]
            }
        ],
        "slots": {
            // default  默认插槽
            "default": {
                "label": {
                "zh_CN": "default"
                },
                "description": {
                "zh_CN": "自定义默认内容"
                }
            },
            // icon 自定义图标插槽,打开该开关之后,用户可以自定义 icon
            "icon": {
                "label": {
                    "zh_CN": "icon"
                },
                "description": {
                    "zh_CN": "自定义图标组件"
                }
            }
        }
    }
}
保存文件,刷新页面,重新拖入 ElButton 组件。即可测试自定义图标功能。
至此,就实现了如何添加第三方组件,并根据第三方组件的属性文档添加属性可配置项。
2.5 使用预览功能
添加完成后,开发者也可以发挥自己的想象力,使用已有组件和添加的两个按钮组件进行搭建页面。并使用页面预览功能完成渲染。
关于OpenTiny
OpenTiny 是一套企业级 Web 前端开发解决方案,提供跨端、跨框架、跨版本的 TinyVue 组件库,包含基于 Angular+TypeScript 的 TinyNG 组件库,拥有灵活扩展的低代码引擎 TinyEngine,具备主题配置系统TinyTheme / 中后台模板 TinyPro/ TinyCLI 命令行等丰富的效率提升工具,可帮助开发者高效开发 Web 应用。
欢迎加入 OpenTiny 开源社区。添加微信小助手:opentiny-official 一起参与交流前端技术~
OpenTiny 官网:https://opentiny.design/
OpenTiny 代码仓库:https://github.com/opentiny/
TinyVue 源码:https://github.com/opentiny/tiny-vue
TinyEngine 源码: https://github.com/opentiny/tiny-engine
欢迎进入代码仓库 Star🌟TinyEngine、TinyVue、TinyNG、TinyCLI~ 如果你也想要共建,可以进入代码仓库,找到 good first issue标签,一起参与开源贡献~
- TinyEngine 默认自带 TinyVue 组件库的物料。同时也支持集成其他第三方组件库比如 Element Plus 、Ant Design Vue 或者是业务方自己的业务组件库。



![[工业自动化-1]:PLC架构与工作原理](https://img-blog.csdnimg.cn/ce10a1471ed14382bc58364cf8bd5209.png)


还没有评论,来说两句吧...