文章目录
- 前言
- 一、网络爬虫
- 1. 介绍
- 2. 爬虫协议
- 3. 法律法规
- 二、相关知识
- 1. HttpClient
- 2. Jsoup
- 三、综合案例
- 1. 案例一
- 2. 案例二
- 四、总结
前言
下篇:Java-网络爬虫(二)
在大数据时代,信息采集是一项重要的工作,而互联网中的数据是海量的,如果单纯靠人力进行信息获取,不仅低效繁琐,而且搜集的成本也会提高,如何自动高效地获取互联网中的数据是一个重要的问题,而爬虫技术就是针对这些问题而生的。
一、网络爬虫
1. 介绍
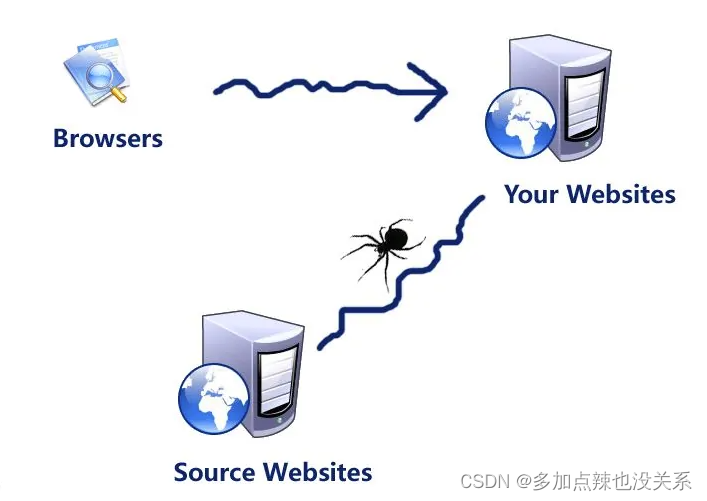
网络爬虫(Web crawler)又称为网络蜘蛛或网络机器人,是一种自动化程序,用于在互联网上浏览和抓取信息,是互联网时代一项普遍运用的网络信息搜集技术。
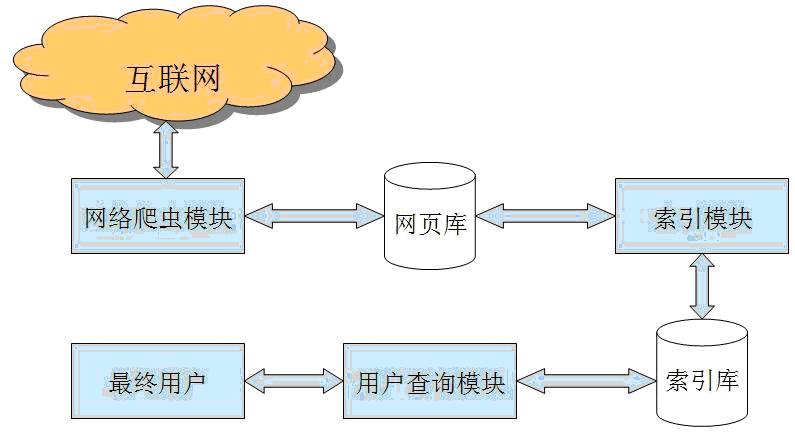
该项技术最早应用于搜索引擎领域,是搜索引擎获取数据来源的支撑性技术之一。随着数据资源的爆炸式增长,网络爬虫的应用场景和商业模式变得更加广泛和多样,较为常见的有新闻平台的内容汇聚和生成、电子商务平台的价格对比功能、基于气象数据的天气预报应用等等。
一个出色的网络爬虫工具能够处理大量的数据,大大节省了人类在该类工作上所花费的时间。网络爬虫作为数据抓取的实践工具,构成了互联网开放和信息资源共享理念的基石,如同互联网世界的一群工蜂,不断地推动网络空间的建设和发展。
原理:
传统爬虫从一个或者若干个初始网页的 URL 开始,通过模拟浏览器行为,自动访问并解析网页。它们可以跟踪链接,从一个网页到另一个网页,逐层遍历整个互联网。通过取网页的HTML源代码,并从中提取有用的信息,如文本、图像、链接等。
功能与价值:
网络爬虫技术是互联网开放共享精神的重要实现工具。允许收集者通过爬虫技术收集数据是数据开放共享的重要措施,网络爬虫能够通过聚合信息、提供链接,为数据所有者的网站带来更多的访问量,这些善意、适量的数据抓取行为,符合数据所有者开放共享数据的预期。
从功能上来讲,爬虫一般分为数据采集、处理、存储三个部分。
爬虫的应用:
- 实现和优化搜索引擎
- 获取更多的数据源
2. 爬虫协议
爬虫的功能十分强大,但是我们并不能为所欲为的使用爬虫,爬虫需要遵循 robots 协议,该协议是国际互联网界通行的道德规范,每一个爬虫都应该遵守。
Robots 协议(也称为爬虫协议、机器人协议等)的全称是 “网络爬虫排除标准”(Robots Exclusion Protocol),网站通过 Robots 协议告诉搜索引擎哪些页面可以抓取,哪些页面不能抓取,该协议属于一个规范,并不能保证网站的隐私。
Robots 协议是国际互联网界通行的道德规范,基于以下原则:
-
搜索技术应服务于人类,同时尊重信息提供者的意愿,并维护其隐私权。
-
网站有义务保证其使用者的个人信息和隐私不被侵犯。
在使用爬虫的时候我们应当注意一下几点:
-
拒绝访问和抓取有关不良信息的网站。
-
注意版权意识,对于原创内容,未经允许不要将信息用于其他用途,特别是商业方面。
-
严格遵循 robots.txt 协议。
-
爬虫协议查看方式
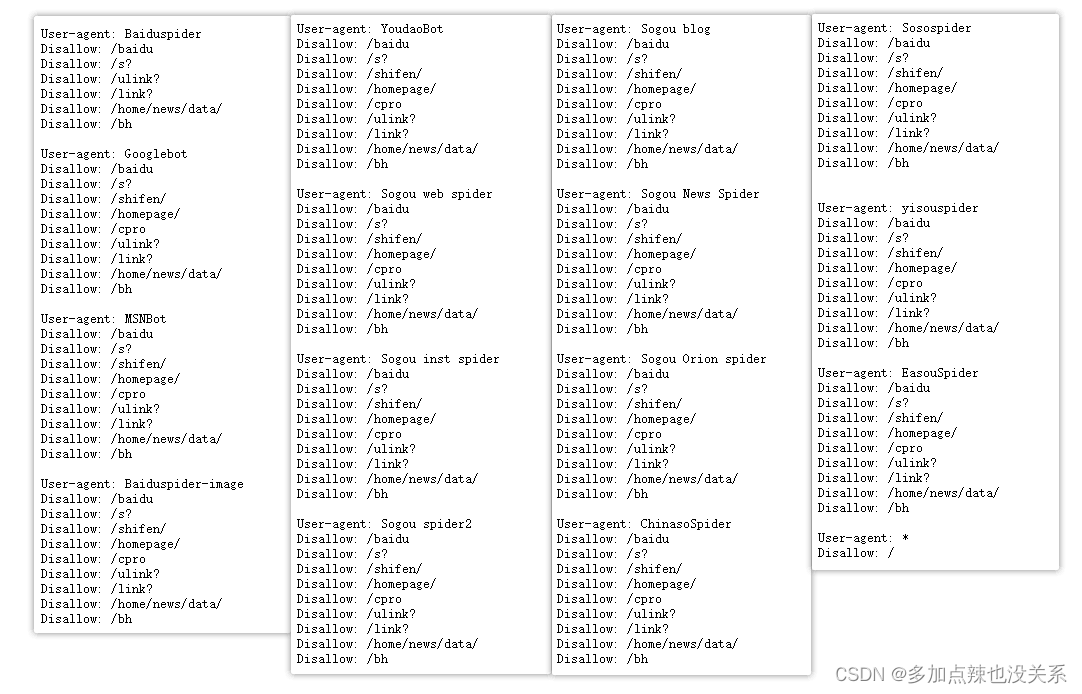
大部分网站都会提供自己的 robots.txt 文件,这个文件会告诉我们该网站的爬取准则,查看方式是在域名加 /robots.txt 并回车。
例如百度的爬虫协议:https://www.baidu.com/robots.txt
- User-agent:为访问用户
- Allow:允许爬行的目录
- Disallow:不允许爬行的目录
- Sitemap:网站地图,告诉爬虫这个页面是网站地图
从上述协议可以看到百度对于普通使用者为:
User-agent: *
Disallow: /
则表示禁止所有搜索引擎访问网站的任何部分。
而对于 Baiduspider 这类用户
User-agent: Baiduspider
Disallow: /baidu
Disallow: /s?
Disallow: /ulink?
Disallow: /link?
Disallow: /home/news/data/
Disallow: /bh
则不能爬取 /baidu、/s?、/ulink?... 下面目录的数据。
3. 法律法规
网络爬虫规制的必要性:
- (一)恶意抓取侵害他人权益和经营自由通过网络爬虫访问和收集网站数据行为本身已经产生了相当规模的网络流量,但是,有分析表明其中三分之二的数据抓取行为是恶意的,并且这一比例还在不断上升:恶意机器人可以掠夺资源、削弱竞争对手。恶意机器人往往被滥用于从一个站点抓取内容,然后将该内容发布至另一个站点,而不显示数据源或链接,这一不当手段将帮助非法组织建立虚假网站,产生欺诈风险,以及对知识产权、商业秘密的窃取行为。
- (二)恶意爬虫危及网络安全从行为本身来讲,恶意爬虫会对目标网站产生 DDOS 攻击的效果,当有成百上千的爬虫机器人与同一网站进行交互,网站将会失去对真实目标的判断,其很难确定哪些流量来自真实用户,哪些流量来自机器人。若平台使用了掺杂虚假访问行为的缺陷数据,做出相关的营销决策,可能会导致大量时间和金钱的损失。尽管 robots 协议作为国际通行的行业规范,能够帮助网站在 robot.txt文件中明确列出限制抓取的信息范围,但并不能从根本上阻止机器人的恶意爬虫行为,其协议本身无法为网站提供任何技术层面的保护。目前恶意的网络爬虫行为已经给互联网平台带来了一定的商业和技术风险,影响了其正常的平台运营和业务开展。
- (三)现行法律规制方式及其不足之处网络爬虫的不当访问、收集、干扰行为应当受到法律规制。目前,我国已有法律对网络爬虫进行规制主要集中在刑法有关计算机信息系统犯罪的相关条文上。从刑法所追求的法益来看,刑法规范的是对目标网站造成严重影响并具有社会危害性的数据抓取行为。若行为人违反刑法的相关规定,通过网络爬虫访问收集一般网站所存储、处理或传输的数据,可能构成刑法中的非法获取计算机信息系统数据罪;如果在数据抓取过程中实施了非法控制行为,可能构成非法控制计算机信息系统罪。此外,由于使用网络爬虫造成对目标网站的功能干扰,导致其访问流量增大、系统响应变缓,影响正常运营的,也可能构成破坏计算机信息系统罪。
由于刑法的谦抑性,其只能在网络爬虫行为产生严重社会危害而无刑罚以外手段进行规制的情形下起到惩治效果,而对于网络爬虫妨碍其他网站正常运行、过量访问收集数据等一般性危害行为很难起到规制作用,因此我国需要建立在刑法以外的行政规制手段,构建完善的刑事责任、行政责任乃至民事责任体系,以保护互联网平台的合法权益,维护网络空间的正常秩序。
完善网络爬虫规制方式的建议:
从网络爬虫的相关案例来看,其使用者往往有充分的理由做出可能涉嫌违法的数据抓取行为,其辩护理由通常包括:“我可以用公开访问的数据做任何事”“这是合理使用行为”“这与搜索引擎行为类似”“只是使用了自动脚本,而未使用在建立网站上”“我已经遵守了它们的 robots 协议”“该网站没有 robots 协议”“这些数据我只是个人研究使用,并没有商业目的”。由此可见,依托行为是否具有恶意或者通过主观层面来判断爬虫行为违法与否是具有难度的。网络爬虫规制的目标是在数据资源开放共享与互联网平台经营自由、网站安全之间取得平衡,遵循技术中立性原则,对网络爬虫进行规制应当基于客观结果,即是否妨碍网站的正常运行或者对他人合法权益造成严重危害。
数字时代,在数据利用成为网络产业中心的背景下,亟待确立数据访问、获取的规则。在技术手段、市场手段之外,需要采用法律手段规制爬虫技术的应用,对特定的数据访问场景进行规范。通过数据安全立法设置爬虫技术严重影响网站正常运行的判断标准,对具有危害性的网络爬虫行为进行适当规制,是我国安全与发展并重互联网治理根本准则在数据治理领域的体现,其目标是在数据活动各方主体中找到平衡点,兼顾数据开放共享与数据所有者经营自由和安全、社会公共利益,确保数据依法有序自由流动。
谨慎使用的技术:
- 爬虫访问频次要控制,别把对方服务器搞崩溃
- 涉及个人隐私的信息不能爬
- 突破网站的反爬措施,后果很严重
- 不要把爬取的数据做不正当竞争
- 付费内容,不要抓
- 突破网络反爬措施的代码,最好不要上传到网络上
二、相关知识
1. HttpClient
因为爬虫技术是模仿游览器行为,那么必然是需要发送 HTTP 请求,在 Java 中 apache 有提供支持 HTTP 协议的客户端编程工具包 HttpClient,可以使用 HttpClient 来发送请求,
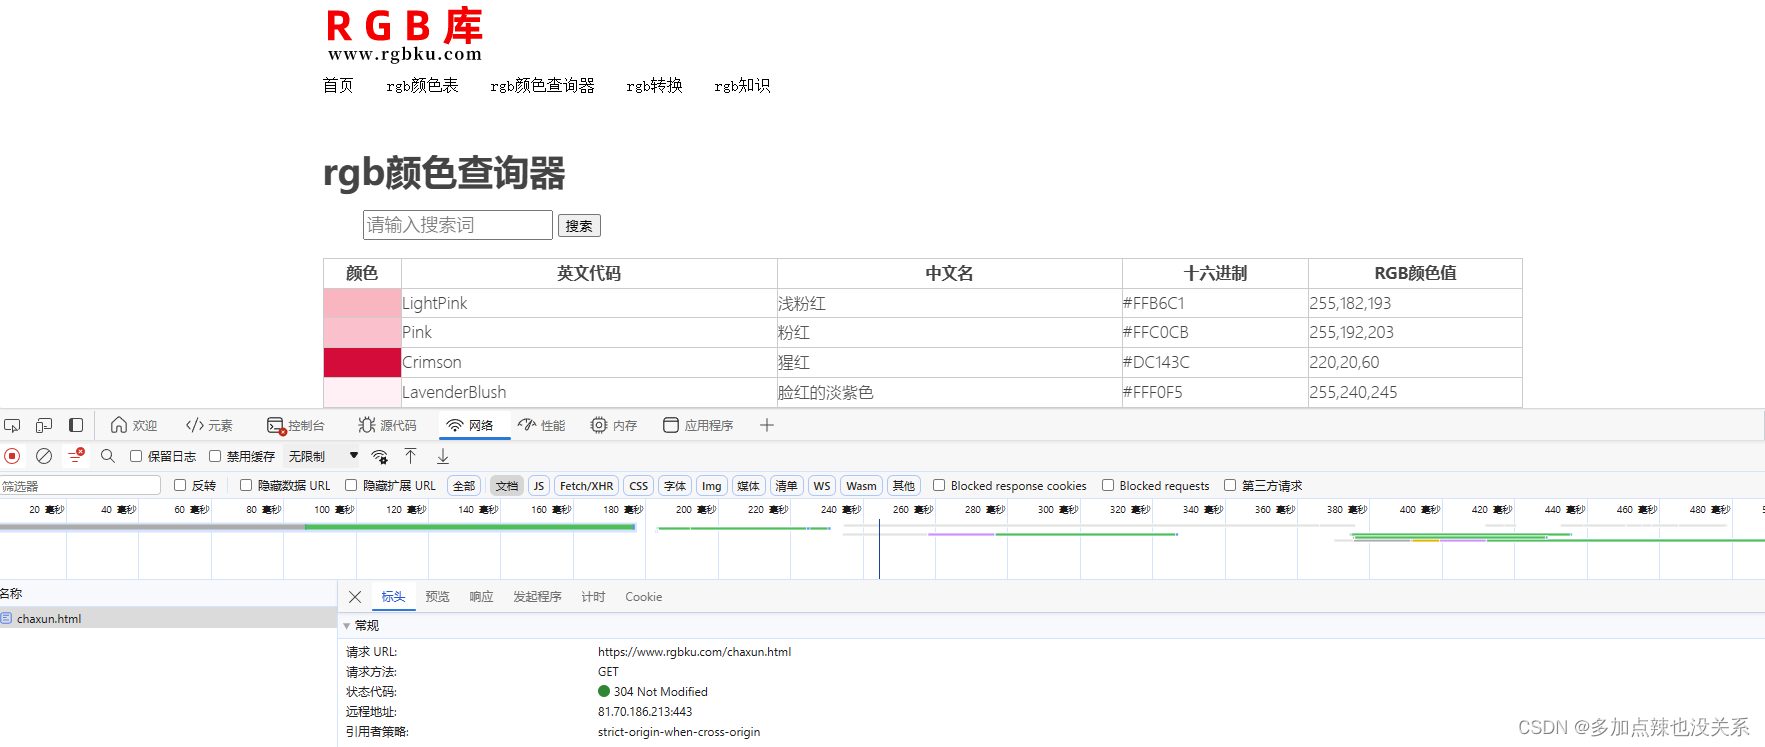
例如:使用 HttpClient 请求 https://www.rgbku.com/chaxun.html(rgb颜色查询器)
那么代码可以这样写:
import org.apache.http.Consts;
import org.apache.http.HttpEntity;
import org.apache.http.client.methods.CloseableHttpResponse;
import org.apache.http.client.methods.HttpGet;
import org.apache.http.impl.client.CloseableHttpClient;
import org.apache.http.impl.client.HttpClients;
import org.apache.http.util.EntityUtils;
import java.io.IOException;
import java.util.Objects;
public class HttpClientDemo {
    public static void main(String[] args) {
        // 创建 httpClient 对象
        CloseableHttpClient httpClient = HttpClients.createDefault();
        // 创建 httpGet 对象,设置访问 URL
        HttpGet httpGet = new HttpGet("https://www.rgbku.com/chaxun.html");
        CloseableHttpResponse response = null;
        try {
            // 发送请求
            response = httpClient.execute(httpGet);
            // 根据状态码判断是否响应成功(一般是 200)
            if (response.getStatusLine().getStatusCode() == 200) {
                // 解析响应
                HttpEntity entity = response.getEntity();
                String html = EntityUtils.toString(entity, Consts.UTF_8);
                // 打印响应内容
                System.out.println(html);
            }
        } catch (IOException e) {
            e.printStackTrace();
        } finally {
            // 关闭资源
            try {
                httpClient.close();
                if (Objects.nonNull(response)) {
                    response.close();
                }
            } catch (IOException e) {
                e.printStackTrace();
            }
        }
    }
}
可以从打印信息中就能看出已获取到该网站的 HTML 信息了
HttpClient 不仅可以发送 GET 请求,还能够发起 POST、PUT、DELETE 等等各种请求,同时还能携带参数、token、cookie 和设置 User-Agent 等功能,可以做到很好的模拟用户在游览器上面访问网站。
GET 请求:
    /**
     * 发送不带参数的 GET 请求
     */
    public static void sendGet() throws Exception{
        // 创建 httpClient 对象
        CloseableHttpClient httpClient = HttpClients.createDefault();
        // 创建 httpGet 对象,设置访问 URL
        HttpGet httpGet = new HttpGet("https://www.xxxx.com");
        CloseableHttpResponse response = httpClient.execute(httpGet);
        // 对响应信息进行处理 ...
        // 关闭资源
        response.close();
        httpClient.close();
    }
    /**
     * 发送带参数的 GET 请求
     */
    public static void sendGetHasParam() throws Exception{
        // 创建 httpClient 对象
        CloseableHttpClient httpClient = HttpClients.createDefault();
        // 创建 URIBuilder
        URIBuilder uriBuilder = new URIBuilder("https://www.xxxx.com");
        // 设置参数
        uriBuilder
                .setParameter("param1", "value1")
                .setParameter("param2", "value2");
        // 创建 httpGet 对象,设置 URI
        HttpGet httpGet = new HttpGet(uriBuilder.build());
        CloseableHttpResponse response = httpClient.execute(httpGet);
        // 对响应信息进行处理 ...
        // 关闭资源
        response.close();
        httpClient.close();
    }
POST 请求:
/** * 发送不带参数的 POST 请求 */ public static void sendPost() throws Exception{ // 创建 httpClient 对象 CloseableHttpClient httpClient = HttpClients.createDefault(); // 创建 httpPost 对象,设置访问 URL HttpPost httpPost = new HttpPost("https://www.xxxx.com"); CloseableHttpResponse response = httpClient.execute(httpPost); // 对响应信息进行处理 ... // 关闭资源 response.close(); httpClient.close(); } /** * 发送带参数的 POST 请求 */ public static void sendPostHasParam() throws Exception{ // 创建 httpClient 对象 CloseableHttpClient httpClient = HttpClients.createDefault(); // 创建 httpPost 对象,设置访问 URL HttpPost httpPost = new HttpPost("https://www.xxxx.com"); // 封装表单中的参数 Listparams = new ArrayList<>(); params.add(new BasicNameValuePair("param1", "value1")); params.add(new BasicNameValuePair("param2", "value2")); /* * 创建表单的 entity 对象 * parameters:表单数据 * charset:编码 */ UrlEncodedFormEntity entity = new UrlEncodedFormEntity(params, Consts.UTF_8); // 设置表单的 entity 对象到 Post 请求中 httpPost.setEntity(entity); CloseableHttpResponse response = httpClient.execute(httpPost); // 对响应信息进行处理 ... // 关闭资源 response.close(); httpClient.close(); } 连接池:
每次发送请求时都需要创建 HttpClient,会有频繁创建和销毁的问题,对性能会有一定的影响,可以使用连接池来解决这个问题
    /**
     * 连接池
     */
    public static void poolManager() throws Exception {
        // 创建连接池管理器
        PoolingHttpClientConnectionManager connectionManager = new PoolingHttpClientConnectionManager();
        // 设置最大连接数
        connectionManager.setMaxTotal(100);
        // 设置每个主机的最大连接数:因为在爬取数据的时候可通会访问多个主机,如果不设置可能会导致连接不均衡
        connectionManager.setDefaultMaxPerRoute(10);
        // 使用连接池管理器发起请求
        doGet(connectionManager);
        doGet(connectionManager);
    }
    /**
     * 通过连接池发送 http 请求
     * @param connectionManager 连接池
     */
    private static void doGet(PoolingHttpClientConnectionManager connectionManager) throws Exception {
        // 从连接池中获取 HttpClient 对象
        CloseableHttpClient httpClient = HttpClients.custom().setConnectionManager(connectionManager).build();
        // 创建 httpGet 对象,设置访问 URL
        HttpGet httpGet = new HttpGet("https://www.xxxx.com");
        CloseableHttpResponse response = httpClient.execute(httpGet);
        // 对响应信息进行处理 ...
        // 关闭资源
        response.close();
        // 这里要注意的是 httpClient 不需要再关闭了,因为是连接池管理的
        // httpClient.close();
    }
设置请求信息:
有时候因为网络或者目标服务器的原因,请求需要更长的时间才能完成,或者需要改变 User-Agent 的设置才能正常发起请求时,这个时候就需要自定义设置这些参数
    /**
     * 配置请求信息
     */
    private static void setRequestInfo() throws Exception {
        // 创建 httpClient 对象
        CloseableHttpClient httpClient = HttpClients.createDefault();
        // 创建 httpGet 对象,设置访问 URL
        HttpGet httpGet = new HttpGet("https://www.xxxx.com");

        // 配置请求信息
        RequestConfig requestConfig = RequestConfig.custom()
                // 创建连接的最长时间,单位是毫秒
                .setConnectTimeout(1000)
                // 设置获取连接的最长时间,单位是毫秒
                .setConnectionRequestTimeout(500)
                // 设置数据传输的最长时间
                .setSocketTimeout(10 * 1000)
                // 还可以设置其它的设置 ...
                .build();

        // 设置请求信息
        httpGet.setConfig(requestConfig);
        CloseableHttpResponse response = httpClient.execute(httpGet);
        // 对响应信息进行处理 ...
        // 关闭资源
        response.close();
        httpClient.close();
    }
虽然说 HttpClient 已经具备了爬数据的功能,但是使用 HttpClient 得到的响应信息比较难解析其中的内容,要对 html 进行进行大量的字符串处理,编写正则表达式去匹配想要获取的信息,所以通常情况下我们并不会使用这种方式进行数据分析。
2. Jsoup
Jsoup 是一款 Java 的 HTML 解析器,可直接解析某个 URL 地址、HTML 文本内容,它提供了一套非常省力的 API,可通过 DOM、CSS 以及类似于 jQuery 的操作方法来取出操作数据。
主要功能如下:
- 从一个 URL、文件或字符串中解析 HTML
- 使用 DOM 或 CSS 选择器来查找,取出数据
- 可操作 HTML 元素、属性、文本
引入依赖:
    org.jsoup
    jsoup
    1.15.3
示例:还是以 https://www.rgbku.com/chaxun.html(rgb颜色查询器) 这个网址为例,获取该网址的 title 内容
import org.jsoup.Jsoup; import org.jsoup.nodes.Document; import java.net.URL; public class JsoupDemo { public static void main(String[] args) throws Exception { // 解析 URL Document document = Jsoup.parse(new URL("https://www.rgbku.com/chaxun.html"), 1000); // 比如我想要获取 html 文件中部分的内容 String title = document // 获取所有的 title 标签 .getElementsByTag("title") // 拿到第一个 .first() // 获取标签中的文本内容 .text(); // 打印 System.out.println("title = " + title); } } </pre> <p>日志信息:</p> <p><a class="view-image" href="https://img-blog.csdnimg.cn/direct/58faf990f95d4d16a5b18de4c1643868.png" data-fancybox="gallery" title="Java-网络爬虫(一)"><img class="ue-image" src="https://img-blog.csdnimg.cn/direct/58faf990f95d4d16a5b18de4c1643868.png" alt="Java-网络爬虫(一)"></a></p> <p>虽然使用 Jsoup 可以替代 HttpClient 直接发起请求解析数据,但是往往不会这样使用,因为实际的开发过程中,需要使用到多线程、连接池、代理等等方式,而 Jsoup 对这些的支持不是很友好,所以一般把 Jsoup 仅仅作为 Html 解析工具使用</p> <p>(一)加载文档:</p> <pre class="brush:python;toolbar:false"> /** * 通过 URL 加载文档 */ public static void loadingUrl() throws Exception {<!-- --> /* * 解析 URL: * spec:访问问的 url * timeoutMillis:超时时间 */ Document document = Jsoup.parse(new URL("https://www.rgbku.com/chaxun.html"), 1000); // 解析 document } /** * 通过字符串加载文档 */ public static void loadingString() throws Exception {<!-- --> String html = "html-content"; // 解析字符串 Document document = Jsoup.parse(html); // 解析 document } /** * 通过文件架子啊文档 */ public static void loadingFile() throws Exception {<!-- --> // html 文件 File file = new File("D:\\demo.html"); // 解析字符串 Document document = Jsoup.parse(file, "utf8"); // 解析 document } </pre> <p>(二)提取数据:</p> <p>获取元素</p> <ul><li>方式一:使用 DOM 方法提取文档数据 <ul><li>getElementById(String id):根据 id 获取元素</li><li>getElementsByTag(String tag):根据标签获取元素</li><li>getElementsByClass(String className):根据 class 获取元素</li><li>getElementsByAttribute(String key):根据属性获取元素</li><li>getElementsByAttributeValue(String key, String value):根据属性和属性值获取元素</li><li>… <p>示例:</p> <pre class="brush:python;toolbar:false"> /** * 使用DOM方法获取元素 */ public static void getElementByDom() throws Exception {<!-- --> // 加载 document Document document = Jsoup.parse(new URL("https://www.xxxx.com"), 1000); // 根据 id 获取元素 Element idElement = document.getElementById("id"); // 根据标签获取元素 Elements tagElements = document.getElementsByTag("tag_name"); // 根据 class 获取元素 Elements classElements = document.getElementsByClass("class_name"); // 根据属性获取元素 Elements attributeElements = document.getElementsByAttribute("attribute"); // 通过属性值获取元素 Elements attributeValueElements = document.getElementsByAttributeValue("attribute", "value"); } </pre> <ul><li>方式二:使用选择器获取元素 <ul><li>select(String cssQuery):通过选择器获取元素 <p>示例:</p> <pre class="brush:python;toolbar:false"> /** * 使用选择器获取元素 */ public static void getElementBySelector() throws Exception {<!-- --> // 加载 document Document document = Jsoup.parse(new URL("https://www.xxxx.com"), 1000); // 通过 id 查找元素 Element idElement = document.select("#id").first(); // 通过标签名称查找元素 Elements tagElements = document.select("tag_name"); // 通过 class 名称查找元素 Elements classElements = document.select(".class_name"); // 通过属性获取元素 Elements attributeElements = document.select("[attribute]"); // 通过属性值获取元素 Elements attributeValueElements = document.select("[attribute=value]"); /* * 选择器可以任意的组合使用 */ // tag#id:标签+ID Elements tagIdElements = document.select("tag_name#id"); // tag.class:标签+class Elements tagClassElements = document.select("tag_name.class_name"); // tag[attribute]:标签+属性名 Elements tagAttributeElements = document.select("tag_name[attribute]"); // tag[attribute].class:标签+属性名+class Elements tagAttributeClassElements = document.select("tag_name[attribute].class_name"); // ancestor child:查询某个元素下的子元素 Elements ancestorChildElements = document.select("ancestor child"); // parent > child:查询直接子元素 Elements parentChildElements = document.select("parent > child"); // parent > *:查找所有子元素 Elements allChildElements = document.select("parent > *"); } </pre> <p>处理元素数据</p> <ul><li>attr(String key):获取属性</li><li>attr(String key, String value):设置属性</li><li>attributes():获取所有属性</li><li>id():获取 id</li><li>className():获取类名</li><li>classNames():获取类名集</li><li>text():获取文本内容</li><li>text(String value):设置文本内容</li><li>html():获取内部 HTML 内容</li><li>html(String value):设置内部 HTML 内容</li><li>outerHtml():获取外部 HTML 值</li><li>data():获取数据内容(例如 script 和 style 标签)</li><li>tag():获取标签</li><li>tagName():获取标签名称</li><li>… <hr /> <h2>三、综合案例</h2> <p> </p> <p>爬虫的工作流程通常包括以下几个步骤:</p> <ol><li> <p>确定起始点:需要指定一个或多个起始 URL 作为抓取的入口点。</p> </li><li> <p>下载网页:使用 HTTP 或 HTTPS 协议向服务器发送请求,下载网页的 HTML 源代码。</p> </li><li> <p>解析网页:解析 HTML 源代码,提取出所需的信息。</p> </li><li> <p>处理数据:对提取的数据进行处理和清洗,以便后续分析和存储。</p> </li><li> <p>跟踪链接:从当前网页中提取所有链接,并将它们添加到待抓取的 URL 队列中,以便进一步遍历。</p> </li><li> <p>控制抓取速度:为了避免给服务器带来过大的负载,爬虫通常会设置抓取速度限制,包括请求间隔时间和并发请求数量。</p> </li><li> <p>存储数据:将提取的数据保存到数据库、文件或其他存储介质中,以便后续使用和分析。</p> </li></ol> <p>以下案例我会将抓取到的数据存放在 excel 文件中,会使用到 EasyExcel,对于 EasyExcel 的使用可参考博客: Java-easyExcel入门教程</p> <h3>1. 案例一</h3> <p> </p> <p>将 RBG 颜色查询器页面中的数据抓取出来之后保存到 excel 表格中</p> <p><a class="view-image" href="https://img-blog.csdnimg.cn/direct/59eaaf49c91f4c51ac5b5ae8c616b102.png" data-fancybox="gallery" title="Java-网络爬虫(一)"><img class="ue-image" src="https://img-blog.csdnimg.cn/direct/59eaaf49c91f4c51ac5b5ae8c616b102.png" alt="Java-网络爬虫(一)"></a></p> <p>分析:</p> <p><a class="view-image" href="https://img-blog.csdnimg.cn/direct/8de97837173c48e7be31d4e8e4593ea4.png" data-fancybox="gallery" title="Java-网络爬虫(一)"><img class="ue-image" src="https://img-blog.csdnimg.cn/direct/8de97837173c48e7be31d4e8e4593ea4.png" alt="Java-网络爬虫(一)"></a></p> <p>从该网址的 HTML 源码分析可得,RGB 的数据来源于 <table> 表格中,<tbody> 定义了表格主题,用于存放数据,每个单元格的数据存放在 <td> 标签中,所以只要拿到 中的文本数据,再剔除掉表头相关的数据即可。</p> <p>代码实现:</p> <p>RgbEntity.java</p> <pre class="brush:python;toolbar:false">import com.alibaba.excel.annotation.ExcelProperty; import com.alibaba.excel.annotation.write.style.*; import com.alibaba.excel.enums.poi.BorderStyleEnum; import com.alibaba.excel.enums.poi.FillPatternTypeEnum; import com.alibaba.excel.enums.poi.HorizontalAlignmentEnum; import io.swagger.annotations.ApiModelProperty; import lombok.AllArgsConstructor; import lombok.Builder; import lombok.Data; import lombok.NoArgsConstructor; /** * RGB 实体类 */ @Data @Builder @AllArgsConstructor @NoArgsConstructor // 头背景设置 @HeadStyle(fillPatternType = FillPatternTypeEnum.SOLID_FOREGROUND, horizontalAlignment = HorizontalAlignmentEnum.CENTER, borderLeft = BorderStyleEnum.THIN, borderTop = BorderStyleEnum.THIN, borderRight = BorderStyleEnum.THIN, borderBottom = BorderStyleEnum.THIN) //标题高度 @HeadRowHeight(40) //内容高度 @ContentRowHeight(30) //内容居中,左、上、右、下的边框显示 @ContentStyle(horizontalAlignment = HorizontalAlignmentEnum.CENTER, borderLeft = BorderStyleEnum.THIN, borderTop = BorderStyleEnum.THIN, borderRight = BorderStyleEnum.THIN, borderBottom = BorderStyleEnum.THIN) public class RgbEntity {<!-- --> @ApiModelProperty(value = "英文代码") @ExcelProperty("英文代码") @ColumnWidth(15) private String engName; @ApiModelProperty(value = "中文名") @ExcelProperty("中文名") @ColumnWidth(15) private String zhName; @ApiModelProperty(value = "十六进制") @ExcelProperty("十六进制") @ColumnWidth(15) private String code; @ApiModelProperty(value = "RGB颜色值") @ExcelProperty("RGB颜色值") @ColumnWidth(15) private String value; } </pre> <p>ReptileDemo.class</p> <pre class="brush:python;toolbar:false">import com.alibaba.excel.EasyExcel; import com.mike.server.system.domain.excel.RgbEntity; import org.jsoup.Jsoup; import org.jsoup.nodes.Document; import org.jsoup.nodes.Element; import org.jsoup.select.Elements; import java.io.File; import java.io.FileOutputStream; import java.io.OutputStream; import java.net.URL; import java.util.ArrayList; import java.util.List; public class ReptileDemo {<!-- --> public static void main(String[] args) throws Exception {<!-- --> demo01(); } /** * 案例一:将 RBG 颜色查询器页面中的数据抓取出来之后保存到 excel 表格中 */ public static void demo01() throws Exception {<!-- --> // 获取 document 文档 Document document = Jsoup.parse(new URL("https://www.rgbku.com/chaxun.html"), 1000); // 通过 id = color 获取 tbody 元素 Element tbodyElement = document.getElementById("color"); // 获取 tbody 下所有的 <tr> 标签 assert tbodyElement != null; Elements childrenElements = tbodyElement.children(); // 创建 RgbEntity 集合存放数据 List<RgbEntity> list = new ArrayList<>(); // 遍历 for (Element childrenElement : childrenElements) {<!-- --> String tagName = childrenElement.tagName(); String align = childrenElement.attr("align"); // 筛选出每一行的数据,剔除表头 if ("tr".equals(tagName) && !"center".equals(align)) {<!-- --> // 获取每个单元格的数据 Elements tdElements = childrenElement.children(); /* * 根据 html 源码分析可得: * (1)每个 <tr> 标签下都有 5 个 <td> 标签 * (2)这五个 <td> 标签中的内容分别对应:颜色 英文代码 中文名 十六进制 RGB颜色值 */ String engName = tdElements.get(1).text(); String zhName = tdElements.get(2).text(); String code = tdElements.get(3).text(); String value = tdElements.get(4).text(); // 添加到集合中 list.add(RgbEntity.builder() .engName(engName) .zhName(zhName) .code(code) .value(value) .build()); } } // 写入到 excel 中 File file = new File("D:\\rgb.xlsx"); OutputStream os = new FileOutputStream(file); EasyExcel.write(os, RgbEntity.class) .sheet("Sheet1").doWrite(list); } } </pre> <p>运行代码生成 excel 文件:</p> <p><a class="view-image" href="https://img-blog.csdnimg.cn/direct/5b4a237f07d64f2ba6f453aadbbb86b6.png" data-fancybox="gallery" title="Java-网络爬虫(一)"><img class="ue-image" src="https://img-blog.csdnimg.cn/direct/5b4a237f07d64f2ba6f453aadbbb86b6.png" alt="Java-网络爬虫(一)"></a></p> <hr /> <h3>2. 案例二</h3> <p> </p> <p>通过食品营养成分查询平台获取所有食品营养成分数据,并持久化到 excel 文件中</p> <p><a class="view-image" href="https://img-blog.csdnimg.cn/direct/80816b5f5c29439098dc9becf2d97304.png" data-fancybox="gallery" title="Java-网络爬虫(一)"><img class="ue-image" src="https://img-blog.csdnimg.cn/direct/80816b5f5c29439098dc9becf2d97304.png" alt="Java-网络爬虫(一)"></a></p> <p><a class="view-image" href="https://img-blog.csdnimg.cn/direct/b6a727ff9df949ef9b72ee9c57348e70.png" data-fancybox="gallery" title="Java-网络爬虫(一)"><img class="ue-image" src="https://img-blog.csdnimg.cn/direct/b6a727ff9df949ef9b72ee9c57348e70.png" alt="Java-网络爬虫(一)"></a></p> <p>这个案例的代码就不太方便展示了,我就简单的说下实现的逻辑:</p> <p><a class="view-image" href="https://img-blog.csdnimg.cn/direct/7df8dd378a774ca2b60a912621b3db9c.png" data-fancybox="gallery" title="Java-网络爬虫(一)"><img class="ue-image" src="https://img-blog.csdnimg.cn/direct/7df8dd378a774ca2b60a912621b3db9c.png" alt="Java-网络爬虫(一)"></a></p> <p>通过分析 HTML 源码可知,从大类(一级分类)列表页面中可以获取到大类的名称和图片以及进入到类别(二级分类)列表页的 URL,在类别(二级分类)的页面中又可以获取到类别的名称和进入到食品列表页的 URL,在食品列表页中可以获取到食品的名称和进入到食品成分页面的 URL,在食品成分页中再拿到所有的成分数据。</p> <p>实体类设计:</p> <pre class="brush:python;toolbar:false">import lombok.AllArgsConstructor; import lombok.Builder; import lombok.Data; import lombok.NoArgsConstructor; import java.util.List; @Data @Builder @NoArgsConstructor @AllArgsConstructor public class FoodInfo {<!-- --> /** * 大类集 */ List<Category> categoryList; /** * 大类(一级分类) */ @Data @Builder @NoArgsConstructor @AllArgsConstructor public static class Category {<!-- --> // 大类名称 private String name; // 大类图片 private String imageUrl; // 类别集 private List<Type> typeList; /** * 类别(二级分类) */ @Data @Builder @NoArgsConstructor @AllArgsConstructor public static class Type {<!-- --> // 类别名称 private String name; // 食物集 private List<Food> foodList; /** * 食物 */ @Data @Builder @NoArgsConstructor @AllArgsConstructor public static class Food {<!-- --> // 食物名称 private String name; // 组成成分集 private List<Component> componentList; /** * 组成成分 */ @Data @Builder @NoArgsConstructor @AllArgsConstructor public static class Component {<!-- --> // 营养素类型 private String nutrientType; // 项目 private String itemName; // 含量 private String value; // 同类排名 private String sort; // 同类均值 private String avgValue; } } } } } </pre> <p>这里要注意的首先是 URL 的拼接,因为链接是相对路径的形式,其次是要创建连接池避免资源的浪费,设置访问间隔的时间别把对方服务器搞崩溃。</p> <hr /> <h2>四、总结</h2> <p> </p> <p>在实际应用中,爬虫可能需要处理一些挑战和限制,如动态网页、反爬虫机制、登录和验证码等。为了应对这些问题,爬虫可能需要使用代理、用户代理伪装、验证码识别等技术。</p> <p>值得注意的是,尽管爬虫可以自动化地抓取网页,但在使用爬虫时,需要遵守法律法规和网站的使用规则,避免侵犯他人的权益或引起不良后果。</p> <p>下篇:Java-网络爬虫(二)</p> <hr /> <p>参考文献:</p> <p>爬虫协议:https://www.dotcpp.com/course/317</p> <p>网络爬虫的法律规制:http://www.cac.gov.cn/2019-06/16/c_1124630015.htm?from=singlemessage</p> <p>Java 爬虫之 JSoup 使用教程:https://my.oschina.net/suveng/blog/4796066</p> <p>JSoup教程:https://www.yiibai.com/jsoup</p> </div> </div> <div class="post-statement"> <p>转载请注明来自<a href="http://mnshijie.com/" title="码农世界"><strong>码农世界</strong></a>,本文标题:<a href="http://mnshijie.com/post/36786.html" title="Java-网络爬虫(一)">《Java-网络爬虫(一)》</a></p> </div> <div class="post-share"> 百度分享代码,如果开启HTTPS请参考李洋个人博客 </div> <div id="authorarea"> <div class="authorinfo"> <div class="author-avater"><img alt="" src="http://mnshijie.com/zb_users/avatar/0.png" class="avatar avatar-50 photo" height="50" width="50"></div> <div class="author-des"> <div class="author-meta"> <span class="post-author-name"><a href="http://mnshijie.com/author-1.html" title="由码农世界发布" rel="author">码农世界</a></span> <span class="post-author-tatus"><a href="http://mnshijie.com/author-1.html" target="_blank">37815篇文章</a></span> <span class="post-author-url"><a href="http://mnshijie.com/" rel="nofollow" target="_blank">站点</a></span> <span class="post-author-weibo"><a href="" rel="nofollow" target="_blank">微博</a></span> </div> <div class="author-description">每一天,每一秒,你所做的决定都会改变你的人生!</div> </div> </div> </div> </div> <div id="related"> <div class="related-title">阅读最新文章</div> <ul class="related_img"> <li><a href="http://mnshijie.com/post/37889.html" title="详细阅读 Visual Studio 连接 MySQL 数据库 实现数据库的读写(C++)" target="_blank"><img src="http://mnshijie.com/zb_users/theme/viewlee/style/noimg/4.jpg" alt="Visual Studio 连接 MySQL 数据库 实现数据库的读写(C++)" class="thumbnail"><h2>Visual Studio 连接 MySQL 数据库 实现数据库的读写(C++)</h2></a></li> <li><a href="http://mnshijie.com/post/37888.html" title="详细阅读 [工业自动化-1]:PLC架构与工作原理" target="_blank"><img src="https://img-blog.csdnimg.cn/ce10a1471ed14382bc58364cf8bd5209.png" alt="[工业自动化-1]:PLC架构与工作原理" class="thumbnail"><h2>[工业自动化-1]:PLC架构与工作原理</h2></a></li> <li><a href="http://mnshijie.com/post/37887.html" title="详细阅读 网络编程(六)TCP并发服务器" target="_blank"><img src="http://mnshijie.com/zb_users/theme/viewlee/style/noimg/9.jpg" alt="网络编程(六)TCP并发服务器" class="thumbnail"><h2>网络编程(六)TCP并发服务器</h2></a></li> <li><a href="http://mnshijie.com/post/37886.html" title="详细阅读 Vue3、Element Plus使用v-for循环el-form表单进行校验" target="_blank"><img src="https://img-blog.csdnimg.cn/direct/34ca8f49a9834f19aa1f2386f3777de3.png" alt="Vue3、Element Plus使用v-for循环el-form表单进行校验" class="thumbnail"><h2>Vue3、Element Plus使用v-for循环el-form表单进行校验</h2></a></li> <li><a href="http://mnshijie.com/post/37885.html" title="详细阅读 Ceph: vdbench 测试ceph存储rbd块设备" target="_blank"><img src="https://img-blog.csdnimg.cn/direct/77c62498365d4c81ae16700a08435706.jpeg" alt="Ceph: vdbench 测试ceph存储rbd块设备" class="thumbnail"><h2>Ceph: vdbench 测试ceph存储rbd块设备</h2></a></li> <li><a href="http://mnshijie.com/post/37884.html" title="详细阅读 linux如何部署前端项目和安装nginx" target="_blank"><img src="https://img-blog.csdnimg.cn/direct/0a2ab1658eac426c88c651326cc1fb77.jpeg" alt="linux如何部署前端项目和安装nginx" class="thumbnail"><h2>linux如何部署前端项目和安装nginx</h2></a></li> <li><a href="http://mnshijie.com/post/37883.html" title="详细阅读 Windows OpenVPN的安装之服务器自动启动连接" target="_blank"><img src="http://mnshijie.com/zb_users/theme/viewlee/style/noimg/9.jpg" alt="Windows OpenVPN的安装之服务器自动启动连接" class="thumbnail"><h2>Windows OpenVPN的安装之服务器自动启动连接</h2></a></li> <li><a href="http://mnshijie.com/post/37882.html" title="详细阅读 服务器数据恢复—KVM虚拟机被误删除如何恢复虚拟磁盘文件?" target="_blank"><img src="https://img-blog.csdnimg.cn/direct/f6ab95f8ca66474c9f65036b6513a849.jpeg" alt="服务器数据恢复—KVM虚拟机被误删除如何恢复虚拟磁盘文件?" class="thumbnail"><h2>服务器数据恢复—KVM虚拟机被误删除如何恢复虚拟磁盘文件?</h2></a></li> </ul> </div><div id="comments" class="clearfix"> <!--评论框--> <div id="comt-respond" class="commentpost"> <h4><i class="fa fa-pencil"></i>发表评论<span><a rel="nofollow" id="cancel-reply" href="#comment" style="display:none;"><small>取消回复</small></a></span></h4> <form id="frmSumbit" target="_self" method="post" action="http://mnshijie.com/zb_system/cmd.php?act=cmt&postid=36786&key=0a5afc761dee40f1cb130abade77a8de" > <input type="hidden" name="inpId" id="inpId" value="36786" /> <input type="hidden" name="inpRevID" id="inpRevID" value="0" /> <div class="comt-box"> <div class="form-group liuyan form-name"><input type="text" id="inpName" name="inpName" class="text" value="" placeholder="昵称" size="28" tabindex="1" /></div> <div class="form-group liuyan form-email"><input type="text" id="inpEmail" name="inpEmail" class="text" value="" placeholder="邮箱" size="28" tabindex="2" /></div> <div class="form-group liuyan form-www"><input type="text" id="inpHomePage" name="inpHomePage" class="text" value="" placeholder="网址" size="28" tabindex="3" /></div></div> <div id="comment-tools"><!--verify--> <div class="tools_title"> <span class="com-title">快捷回复:</span> <a title="粗体字" onmousedown="InsertText(objActive,ReplaceText(objActive,'[B]','[/B]'),true);"><i class="fa fa-bold"></i></a> <a title="斜体字" onmousedown="InsertText(objActive,ReplaceText(objActive,'[I]','[/I]'),true);"><i class="fa fa-italic"></i></a> <a title="下划线" onmousedown="InsertText(objActive,ReplaceText(objActive,'[U]','[/U]'),true);"><i class="fa fa-underline"></i></a> <a title="删除线" onmousedown="InsertText(objActive,ReplaceText(objActive,'[S]','[/S]'),true);"><i class="fa fa-strikethrough"></i></a> <a href="javascript:addNumber('文章不错,写的很好!')" title="文章不错,写的很好!"><i class="fa fa-thumbs-o-up"></i></a> <a href="javascript:addNumber('emmmmm。。看不懂怎么破?')" title="emmmmm。。看不懂怎么破?"><i class="fa fa-thumbs-o-down"></i></a> <a href="javascript:addNumber('赞、狂赞、超赞、不得不赞、史上最赞!')" title="赞、狂赞、超赞、不得不赞、史上最赞!"><i class="fa fa-heart"></i></a> </div> <div class="tools_text"> <textarea placeholder="请遵守相关法律与法规,文明评论。O(∩_∩)O~~" name="txaArticle" id="txaArticle" class="text input-block-level comt-area" cols="50" rows="4" tabindex="5"></textarea> </div> </div> <p> <input name="sumbit" type="submit" tabindex="6" value="提交" onclick="return zbp.comment.post()" class="button" /></p> </form> </div><div class="commentlist"><!--评论输出--> <div class="comment-tab"> <div class="come-comt"> <i class="fa fa-comments"></i>评论列表 <span id="comment_count">(暂无评论,<span style="color:#E1171B">115</span>人围观)</span><span class="iliuyan"><a href="http://mnshijie.com/post/36786.html#comments"><i class="fa fa-bell"></i>参与讨论</a></span> </div> </div> <h2 class="comment-text-center"><i class="fa fa-frown-o"></i> 还没有评论,来说两句吧...</h2><label id="AjaxCommentBegin"></label> </div> <span class="icon icon_comment" title="comment"></span> </div></div> <div id="sidebar-right" class=""><!--侧栏--> <section class="sidebox listree-box"> <h3 class="sidebox_title">文章目录</h3> <ul id="listree-ol"></ul> </section> </div> </div> </div> </div> <link rel="stylesheet" rev="stylesheet" href="http://mnshijie.com/zb_users/theme/viewlee/style/libs/fancybox.css" type="text/css" media="all" /> <script src="http://mnshijie.com/zb_users/theme/viewlee/script/fancybox.js"></script><div id="footer"> <div id="footer-bottom"> <div class="nav-foot"> <div class="credit"> <p>本站不以营利为目的,广告勿扰</p> <p>声明:本站部分内容来源于网络,如果你是该内容的作者,并且不希望本站发布你的内容,请与我们联系,我们将尽快处理!</p> 基于<a href="https://www.zblogcn.com/" title="Z-BlogPHP 1.7.3 Build 173290" target="_blank" rel="noopener norefferrer">Z-BlogPHP</a>搭建 </div> <div class="footernav"> <a class="beian-ico" href="http://beian.miit.gov.cn" rel="nofollow" target="_blank">陕ICP备2021003075号-1</a> </div> </div> </div> </div> <a href="#0" class="cd-top">Top</a> <div class="none"> <script type="text/javascript" src="http://mnshijie.com/zb_users/theme/viewlee/script/viewlee.js?t=2024-02-13"></script> <script type="text/javascript" src="http://mnshijie.com/zb_users/theme/viewlee/script/sticky-sidebar.js"></script> </div> <script src="http://mnshijie.com/zb_users/plugin/txad/js/txad.min.js?t=2023-01-14"></script> </body> </html> <!--268.31 ms , 11 queries , 3847kb memory , 0 error-->
-


